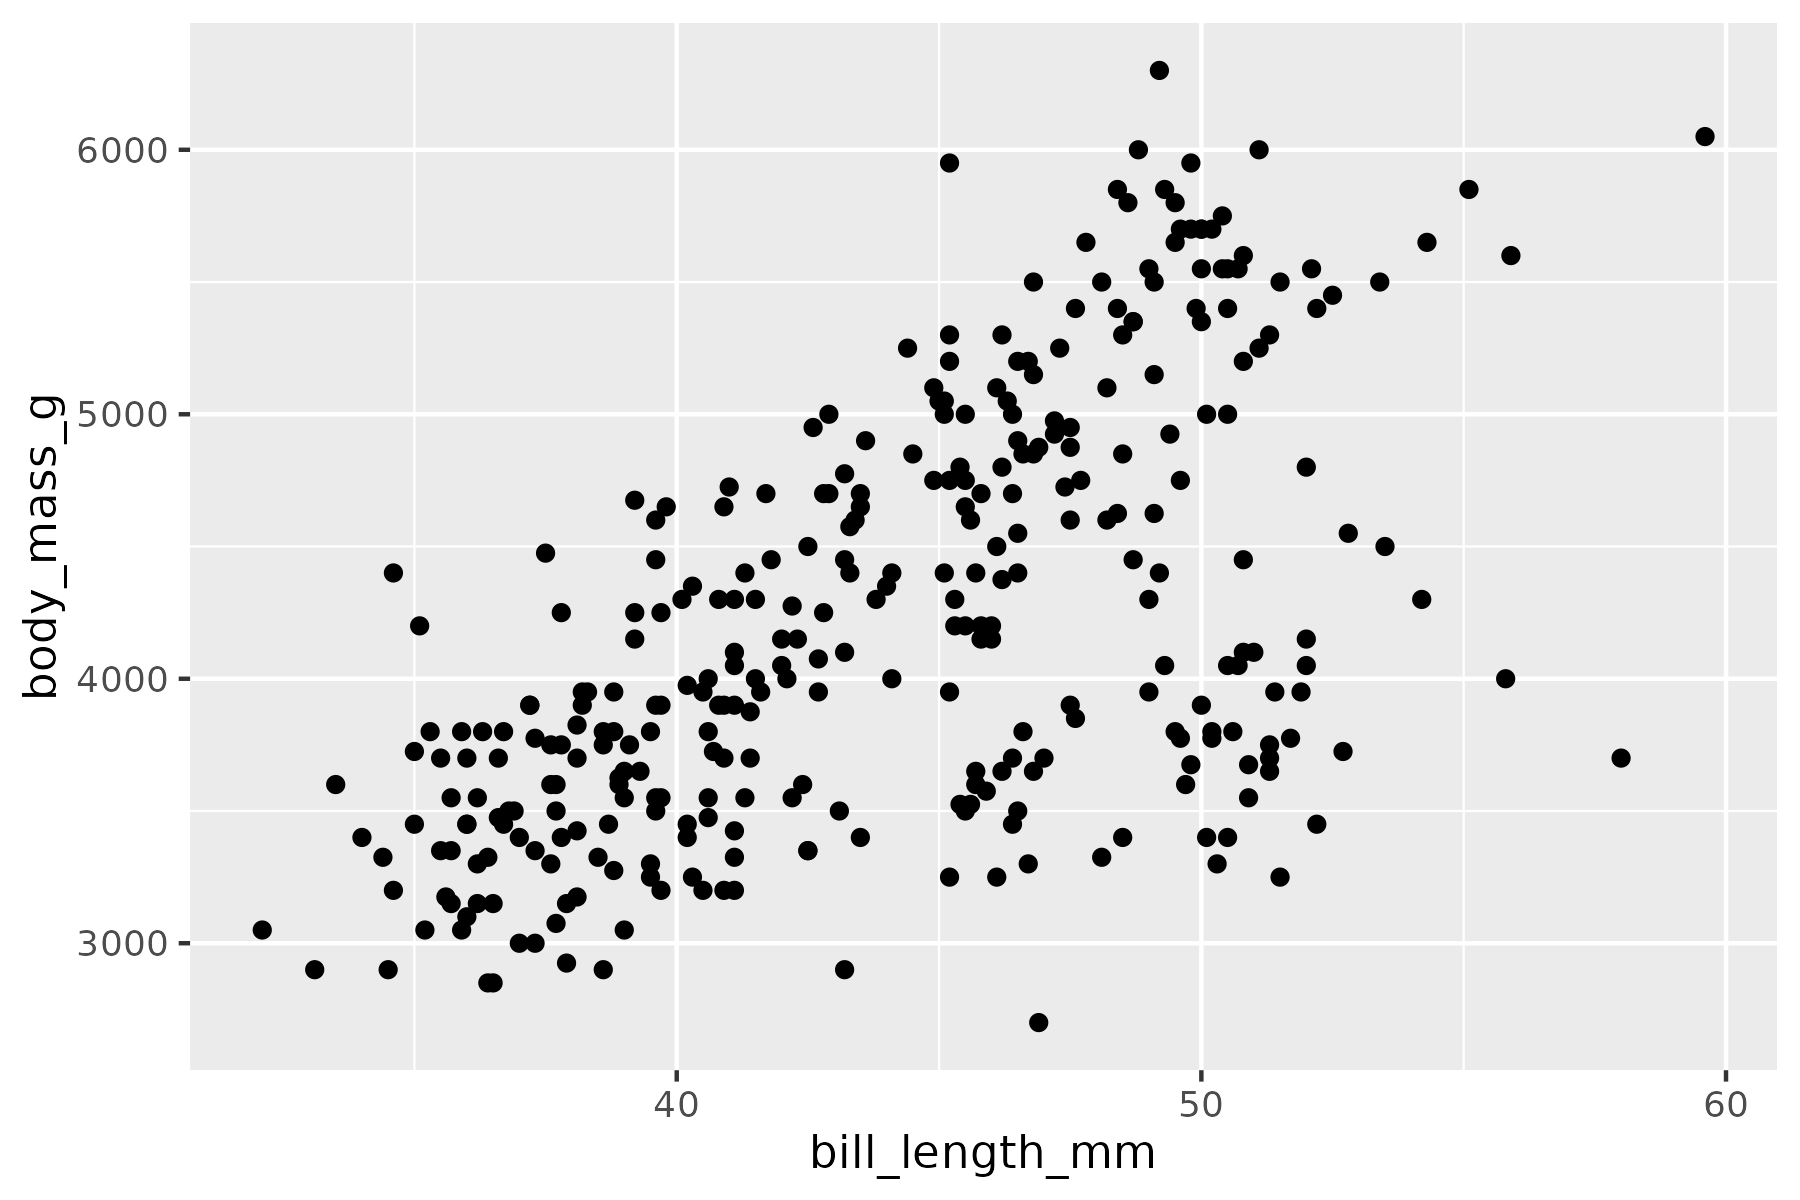
rush plot -x bill_length_mm -y body_mass_g -o plot-scatter.png penguins.csvrush plot
The plot command builds a ggplot2 graphic from your data. Choose columns with --x, --y, --color, and friends, and a sensible geom is guessed for you (override it with --geom).
Usage
rush plot [options] [--] [<file>...]Geom selection
When both --x and --y are given, rush guesses geom_point:
When only --x is given, rush guesses geom_histogram:
rush plot -x body_mass_g -o plot-histogram.png penguins.csv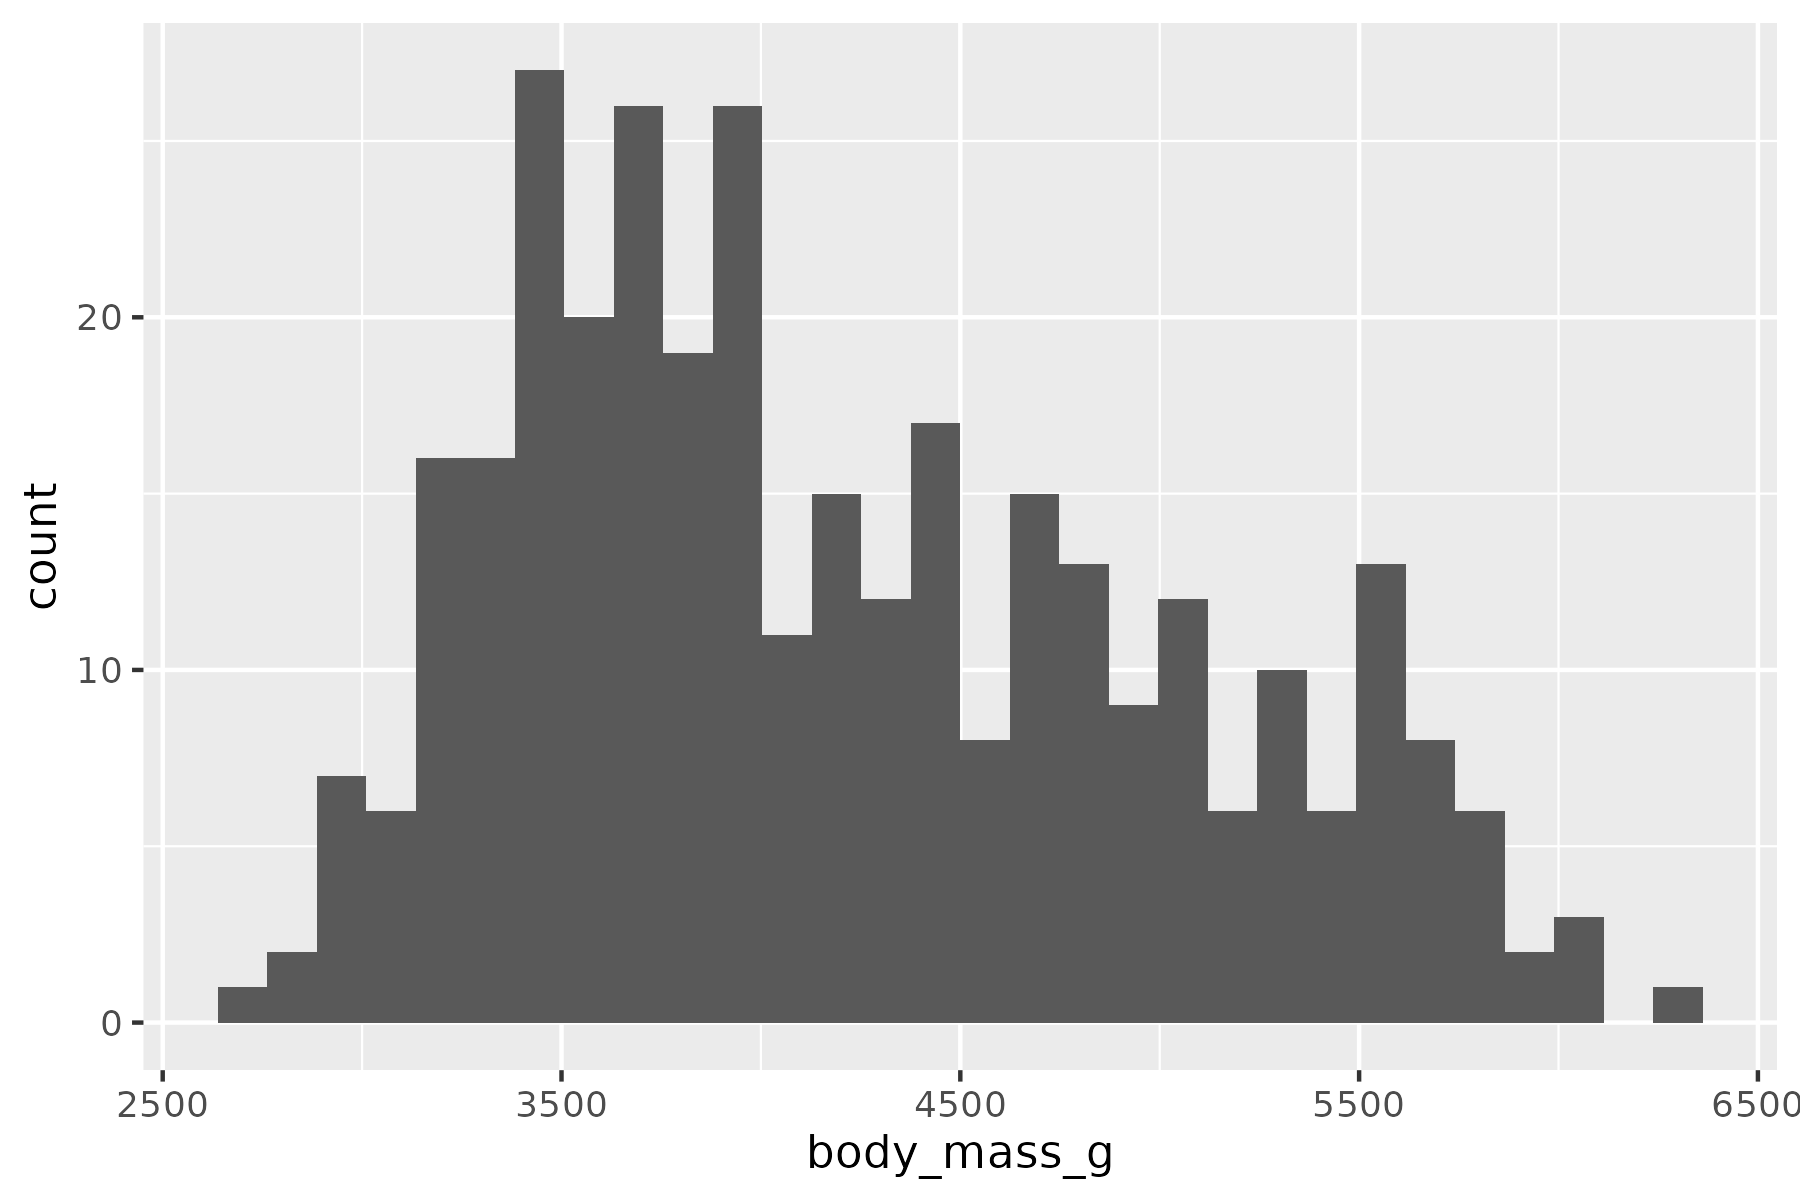
--geom (-g)
Override the guessed geom. Any ggplot2 geom suffix works:
rush plot -x body_mass_g -g density -o plot-density.png penguins.csv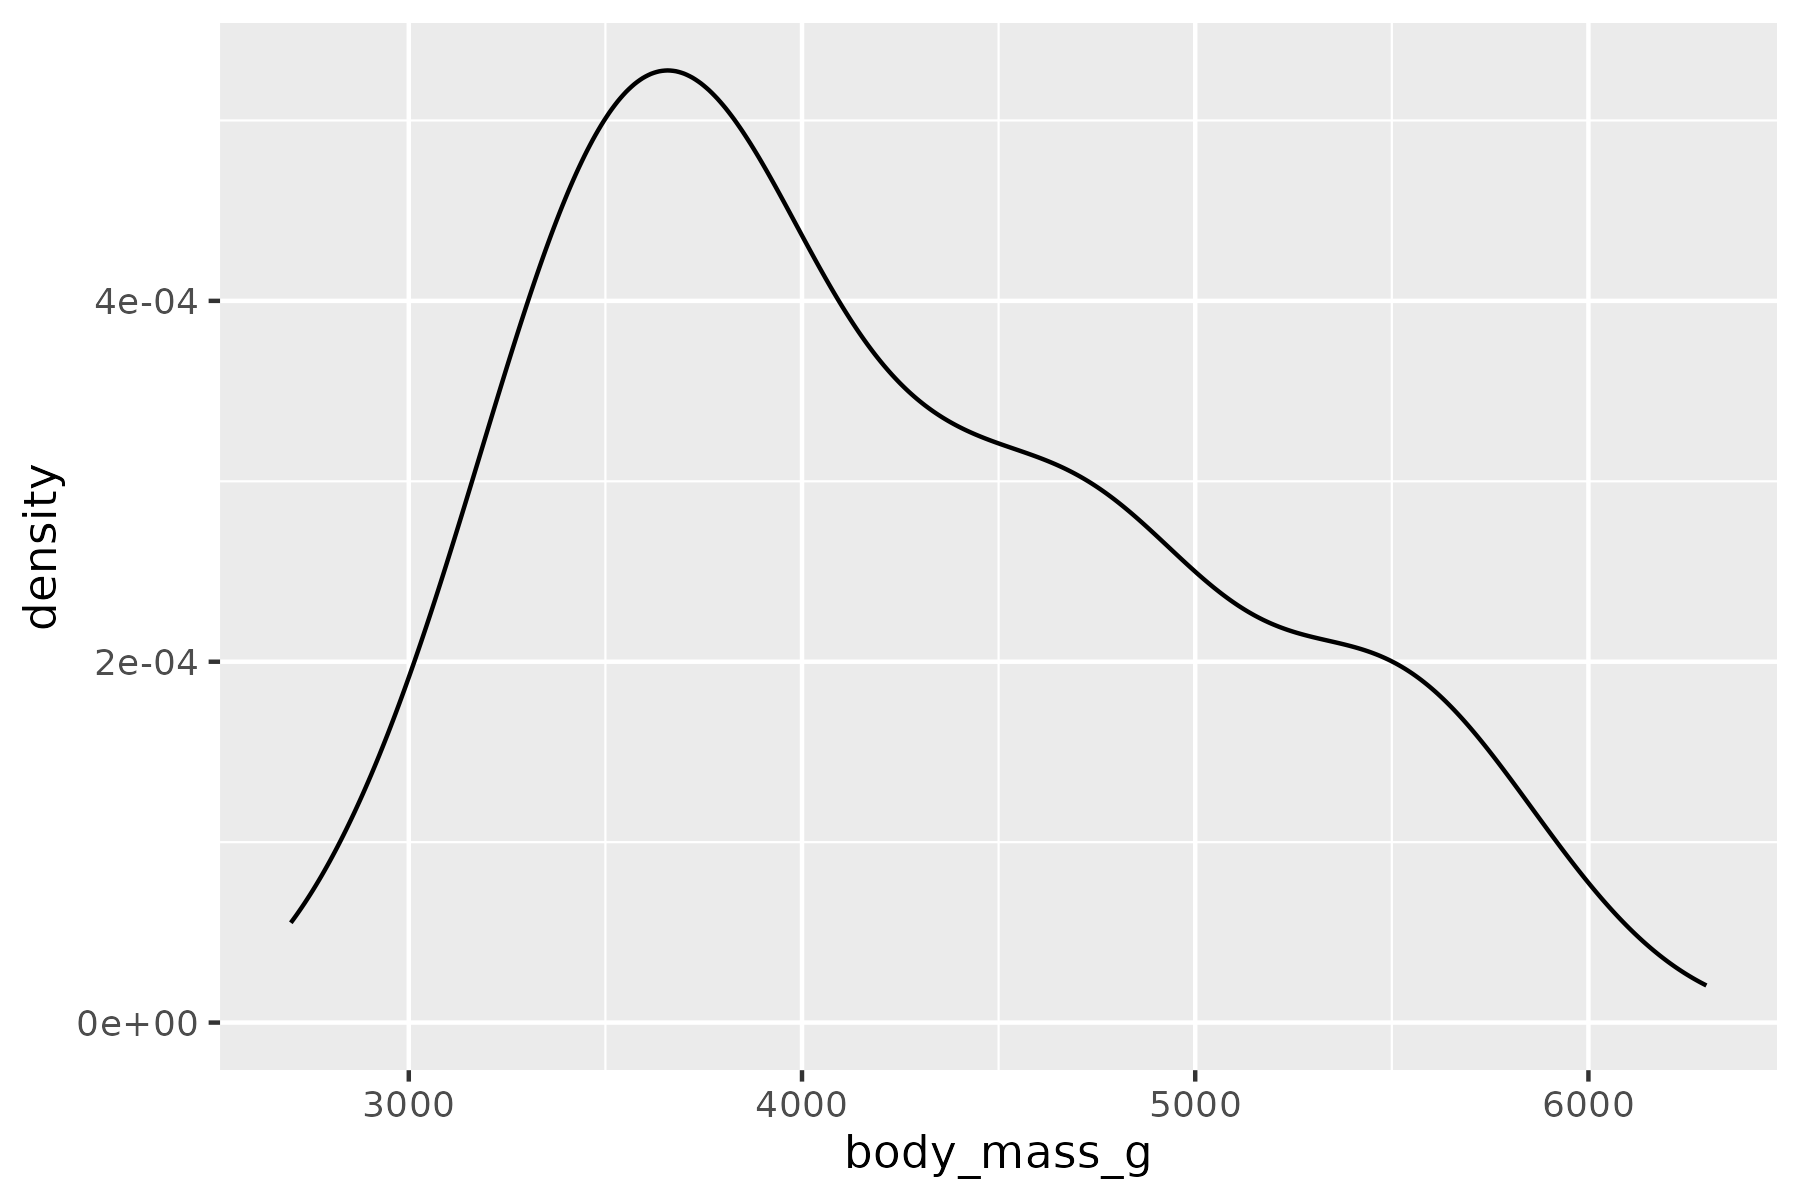
rush plot -x species -y body_mass_g -g boxplot -o plot-boxplot.png penguins.csv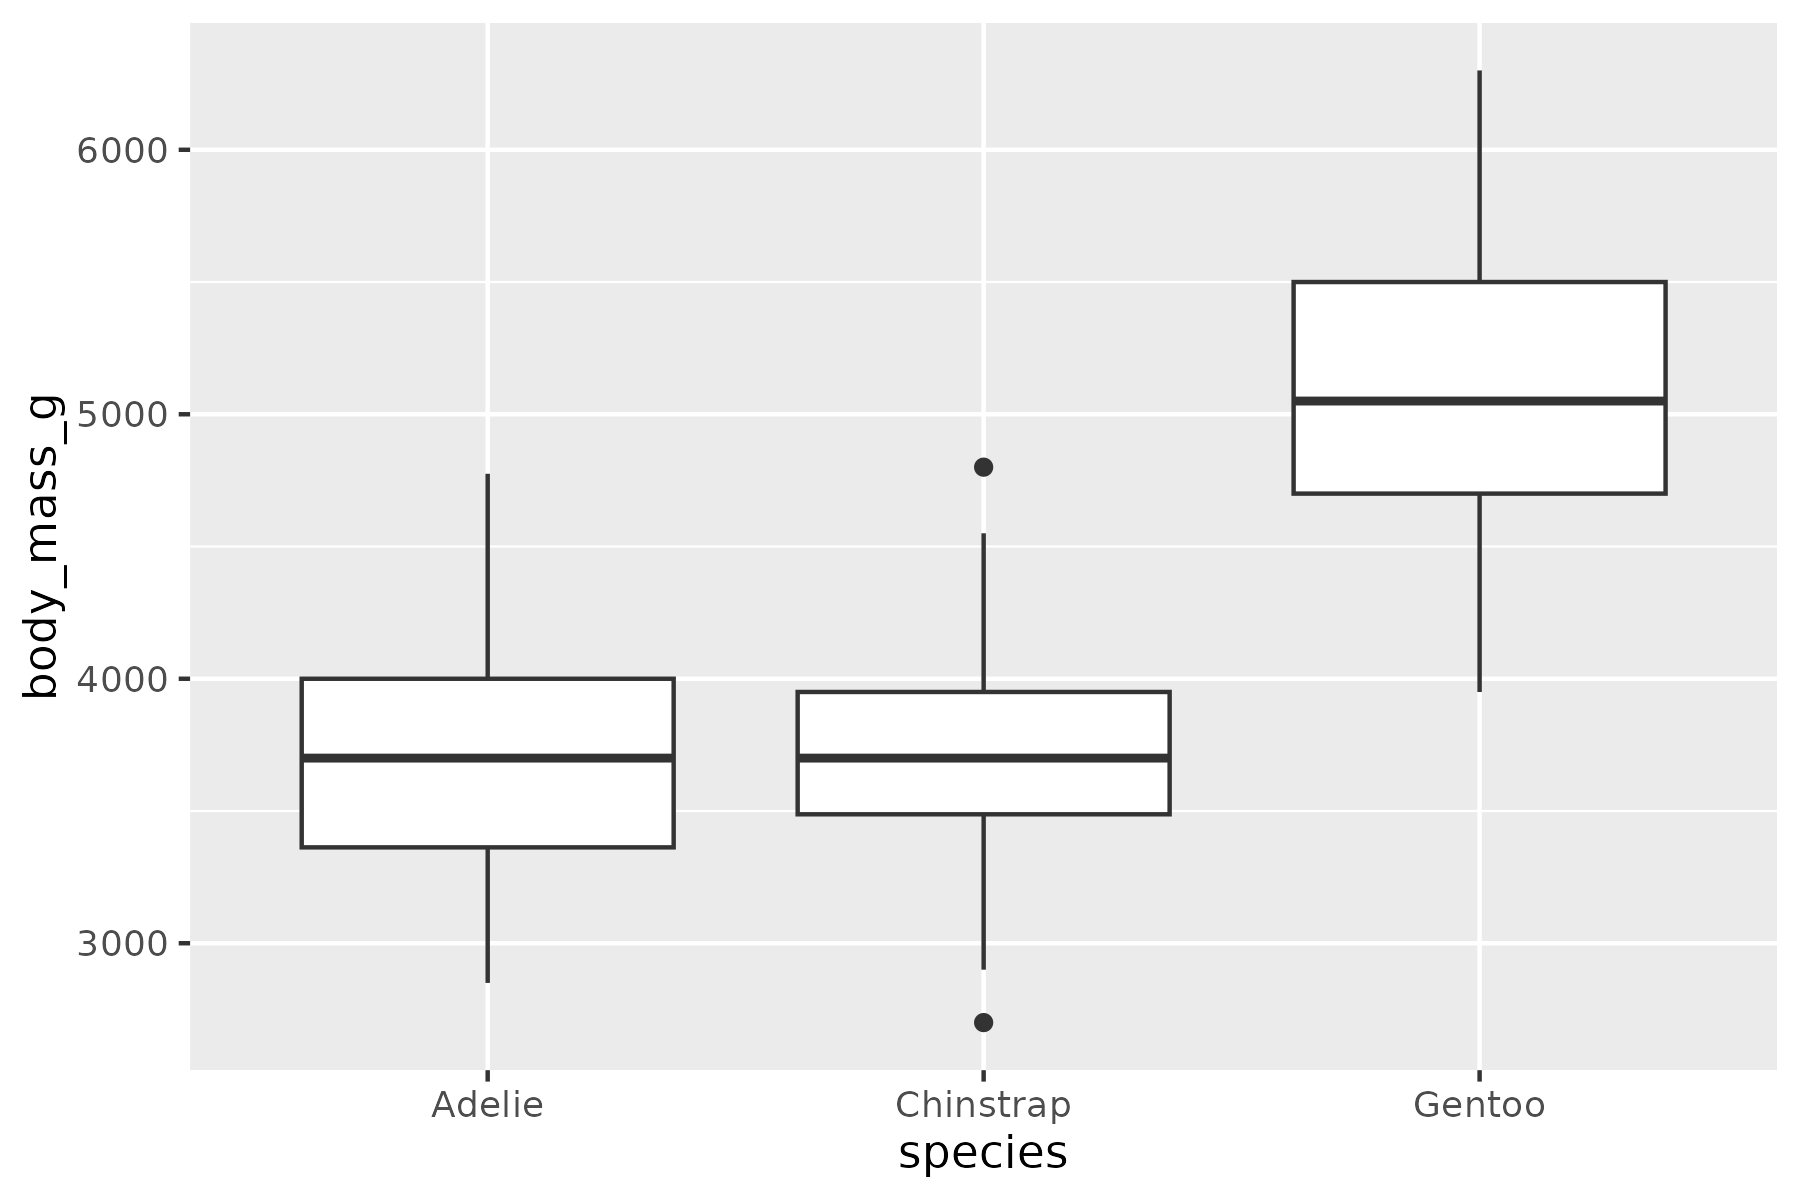
rush plot -x bill_length_mm -y body_mass_g -g smooth -o plot-smooth.png penguins.csv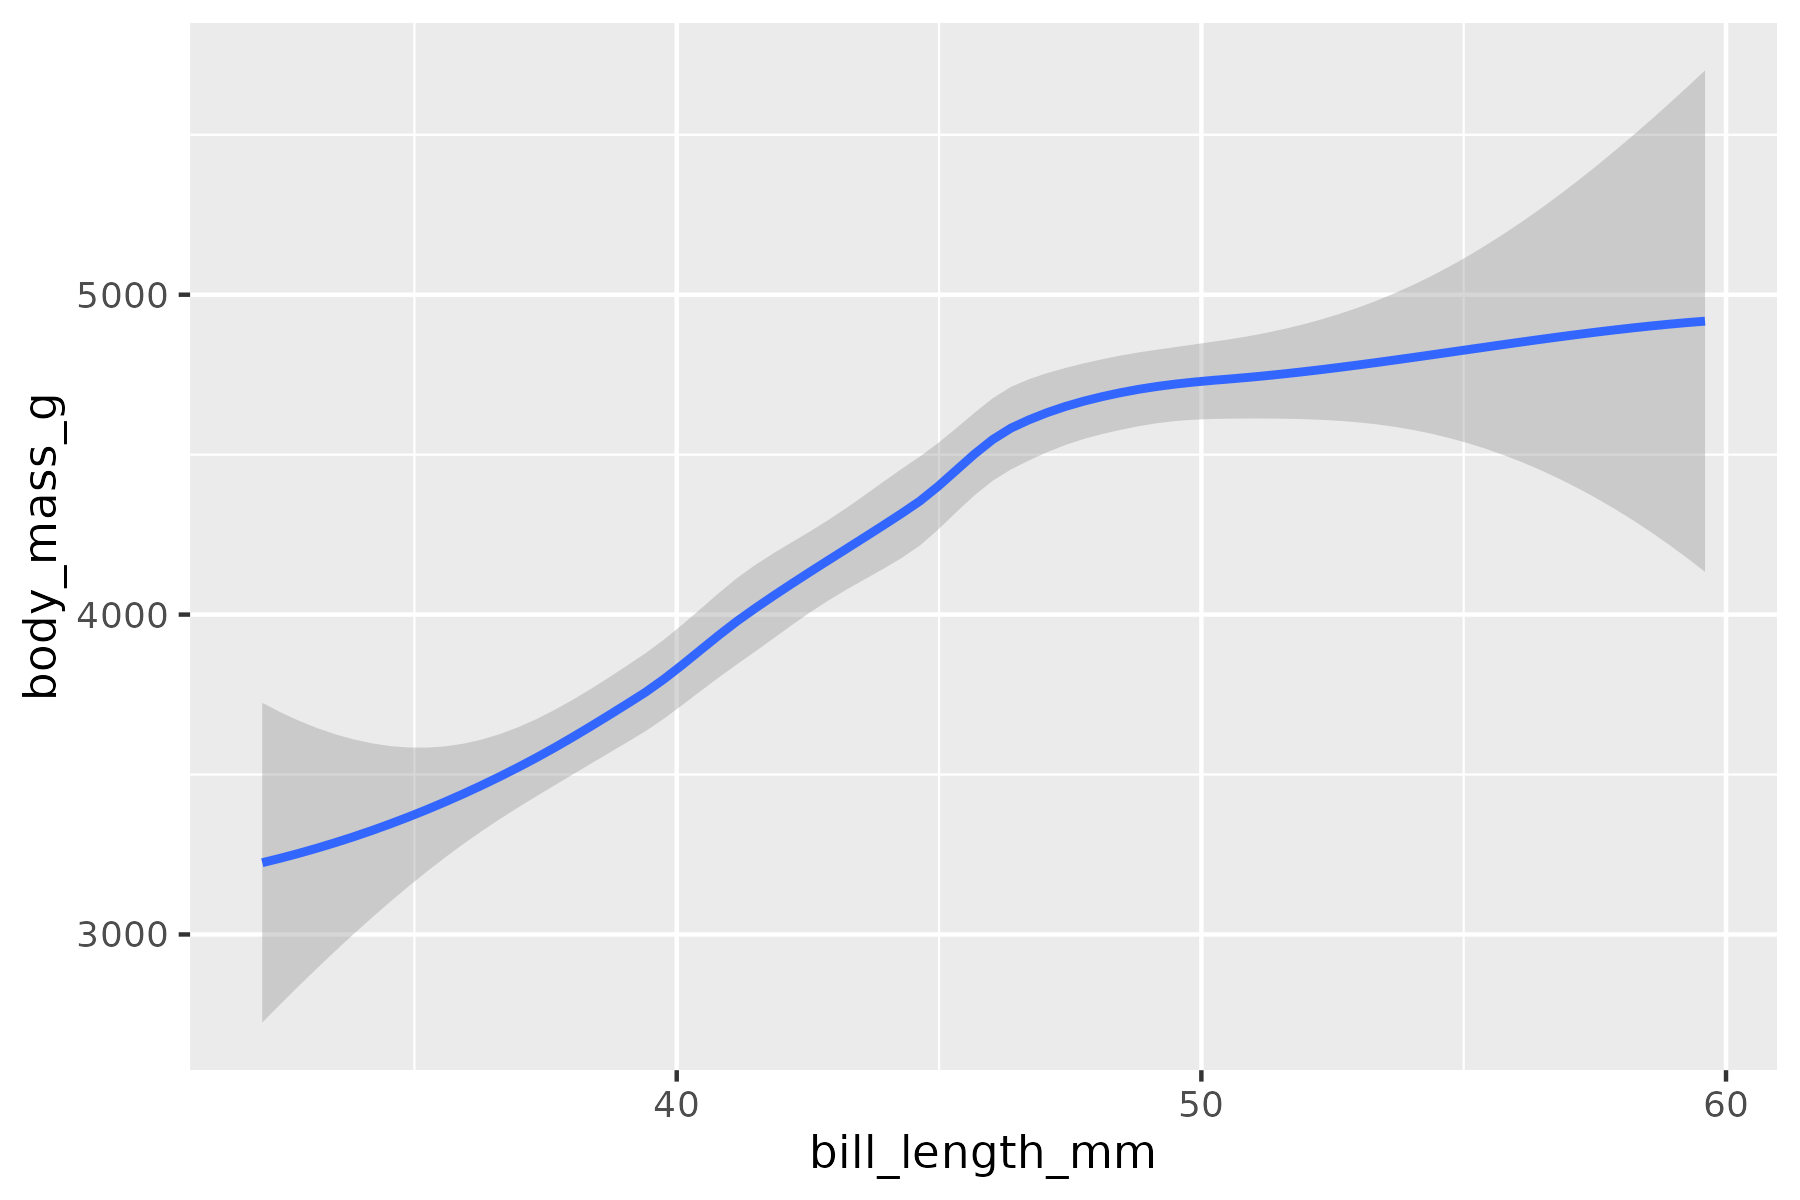
Aesthetics
--color (-c)
Map a column to the color aesthetic:
rush plot -x bill_length_mm -y body_mass_g -c species -o plot-color.png penguins.csv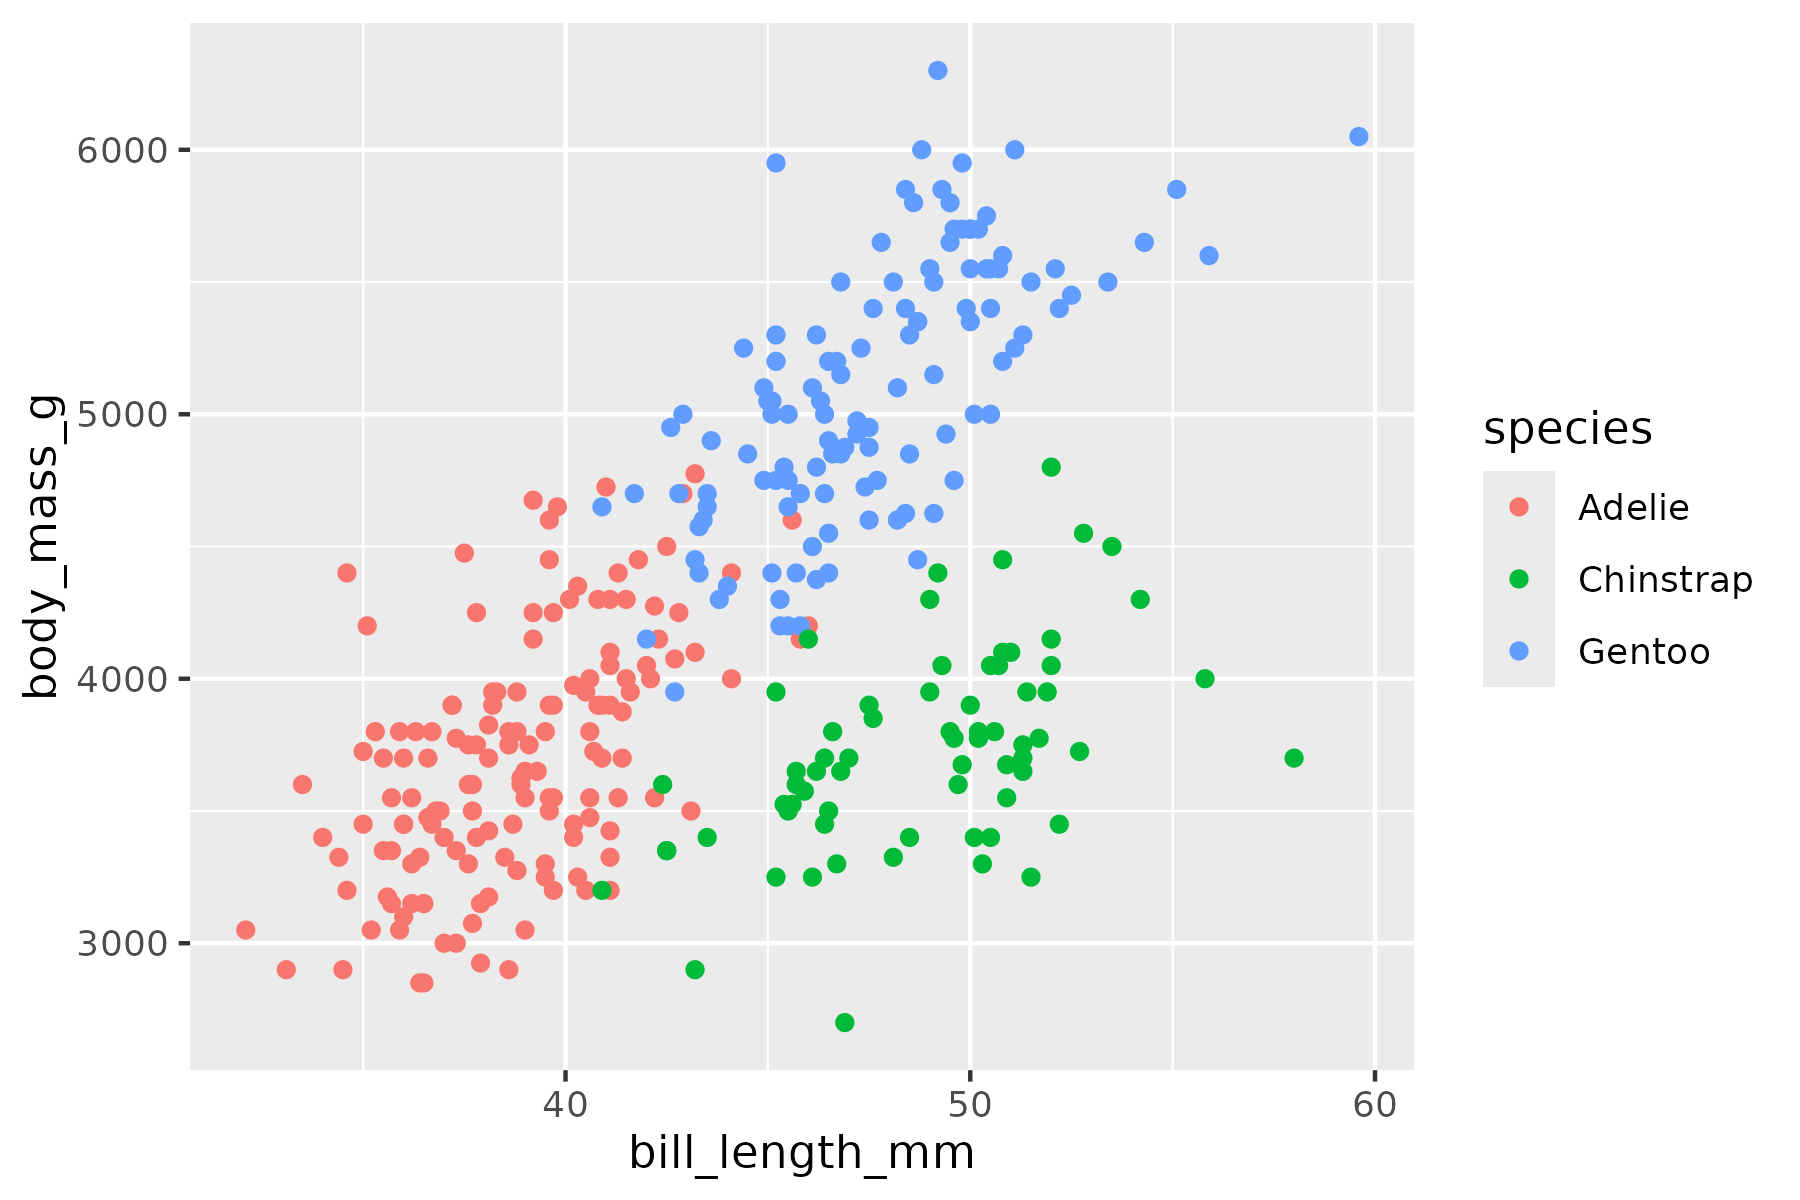
--fill (-f)
Map a column to fill (useful for histograms, bar charts, density plots):
rush plot -x body_mass_g -g density -f species --alpha 0.5 -o plot-fill.png penguins.csv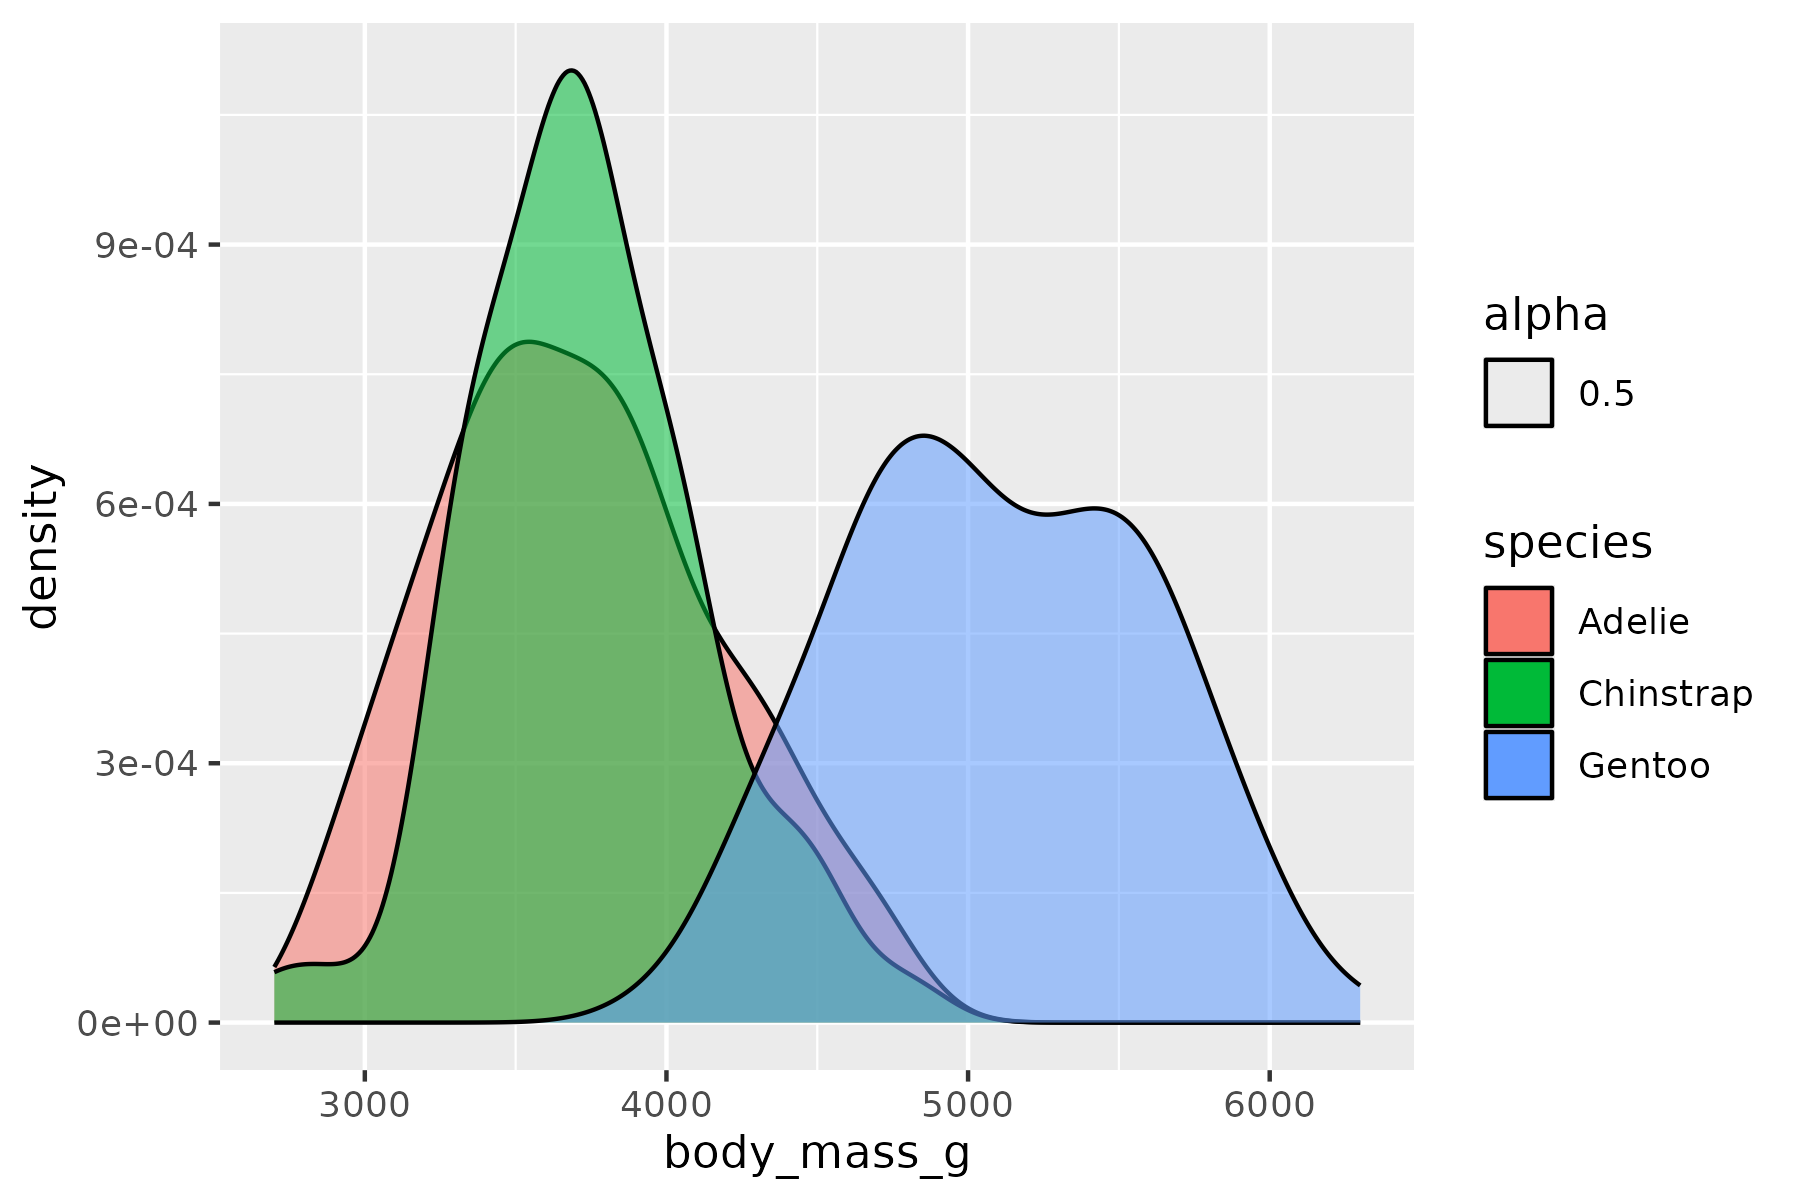
--alpha (-a)
Map a column to transparency, or use a constant for semi-transparent geoms:
rush plot -x bill_length_mm -y body_mass_g --alpha 0.6 -o plot-alpha.png penguins.csv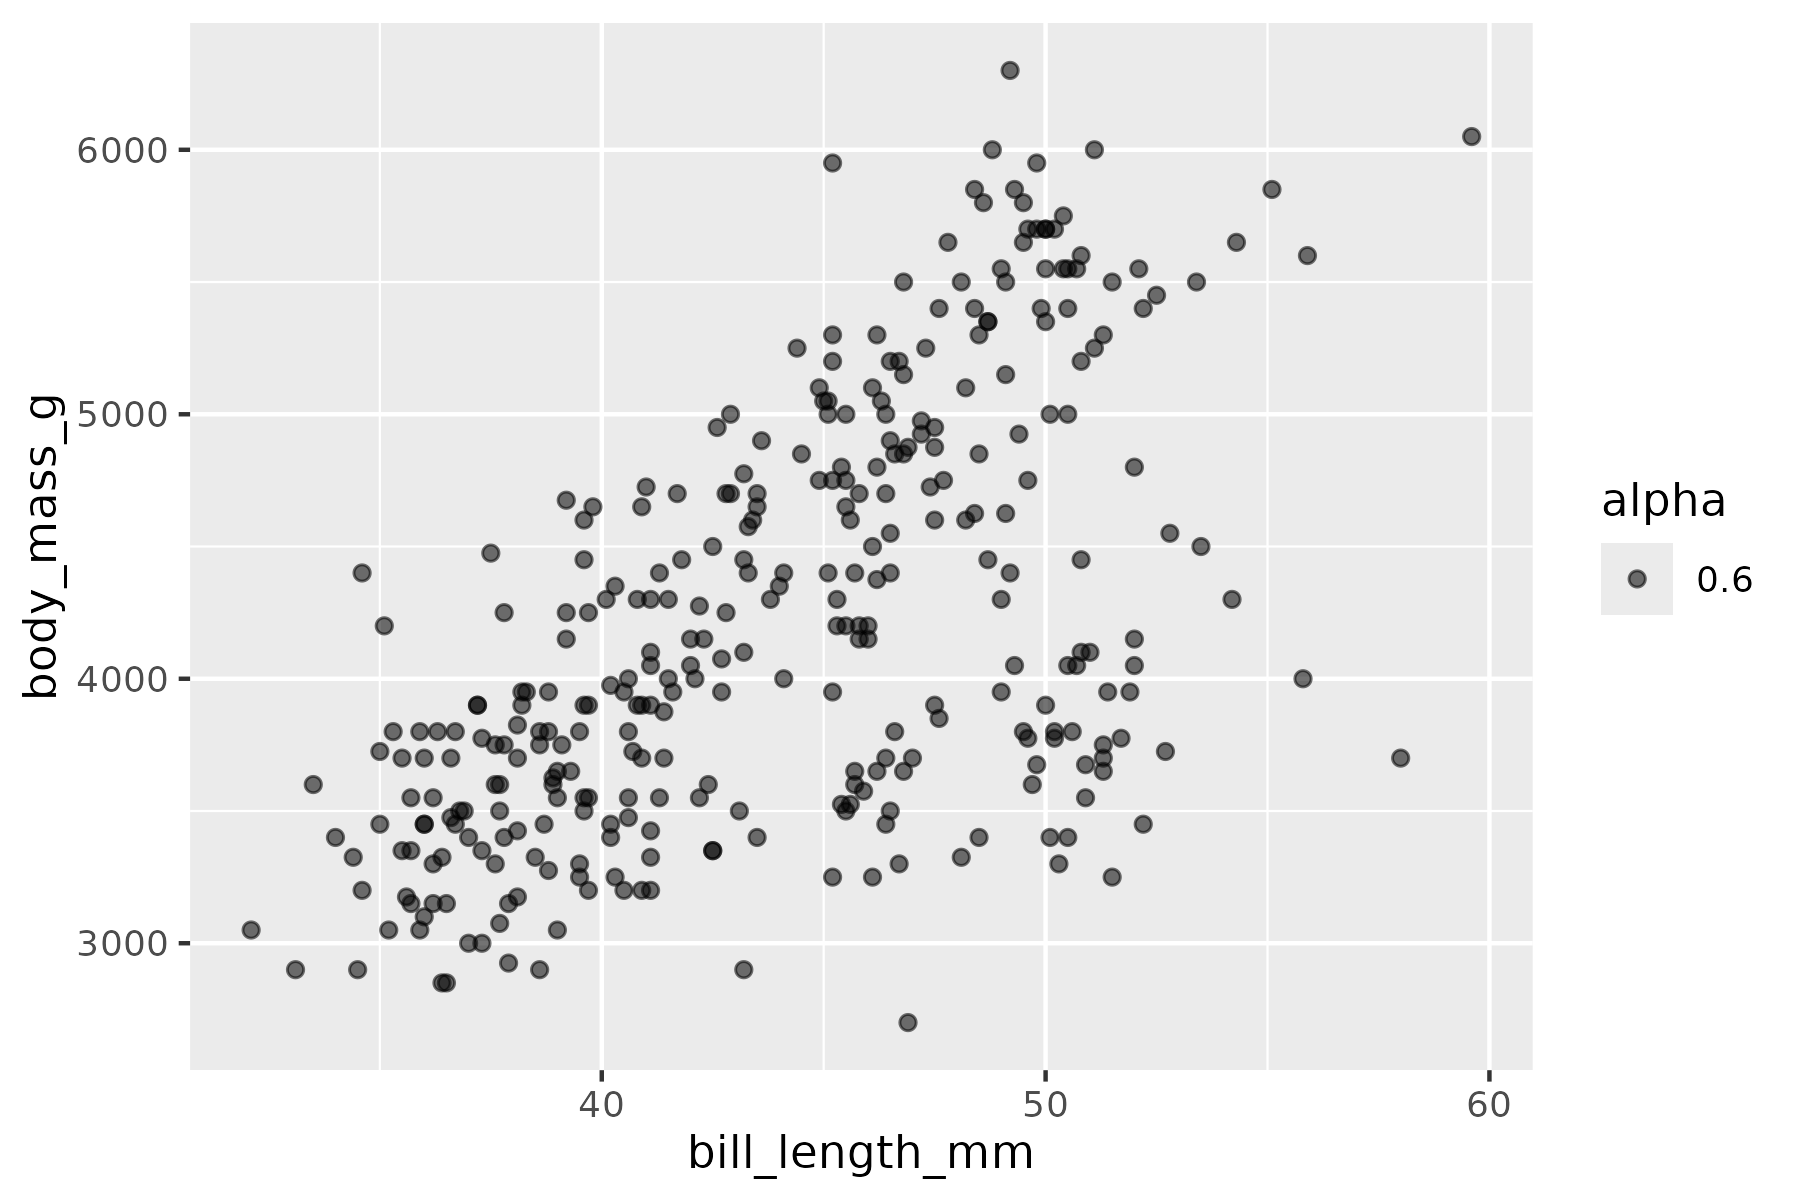
--size
Map a column to point size, great for bubble charts:
rush plot -x bill_length_mm -y body_mass_g --size flipper_length_mm -c species -o plot-size.png penguins.csv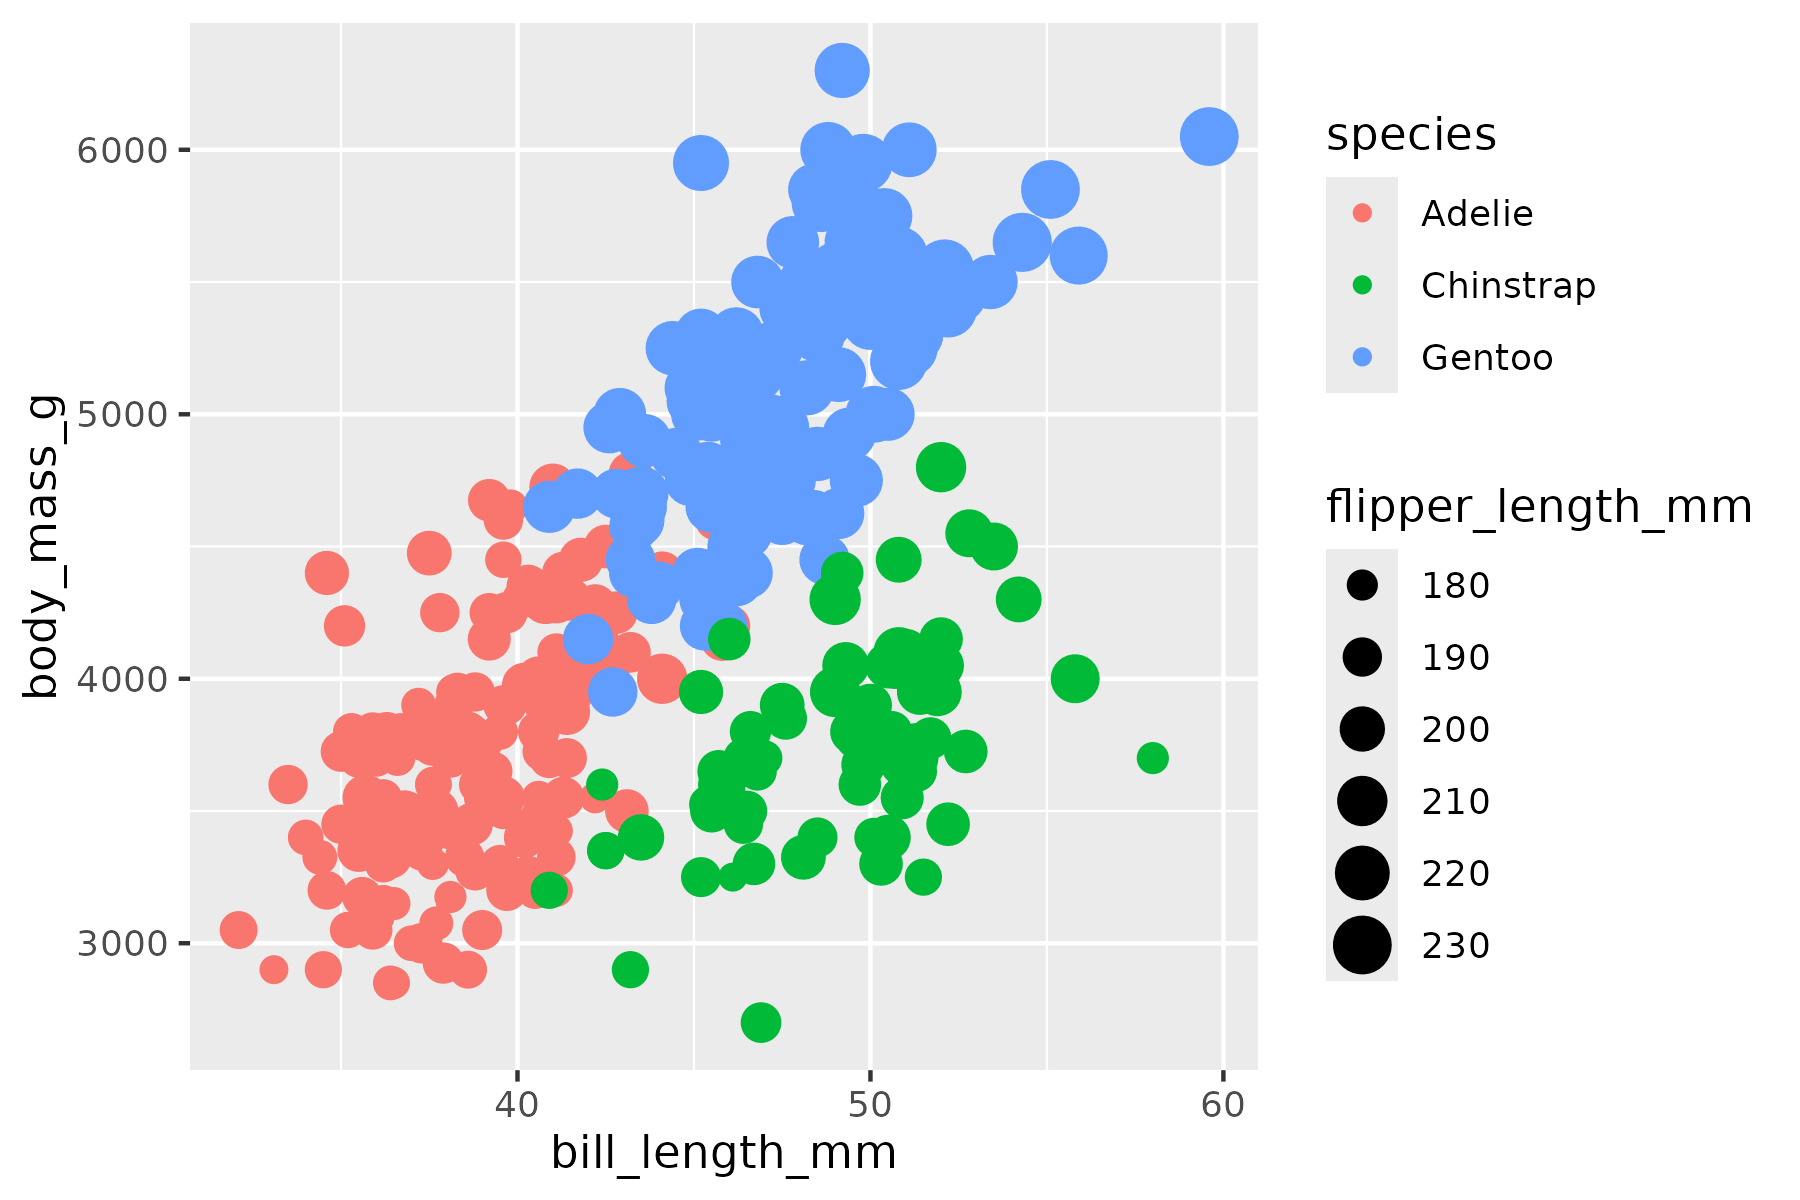
--shape
Map a column to point shape:
rush plot -x bill_length_mm -y body_mass_g --shape sex -o plot-shape.png penguins.csv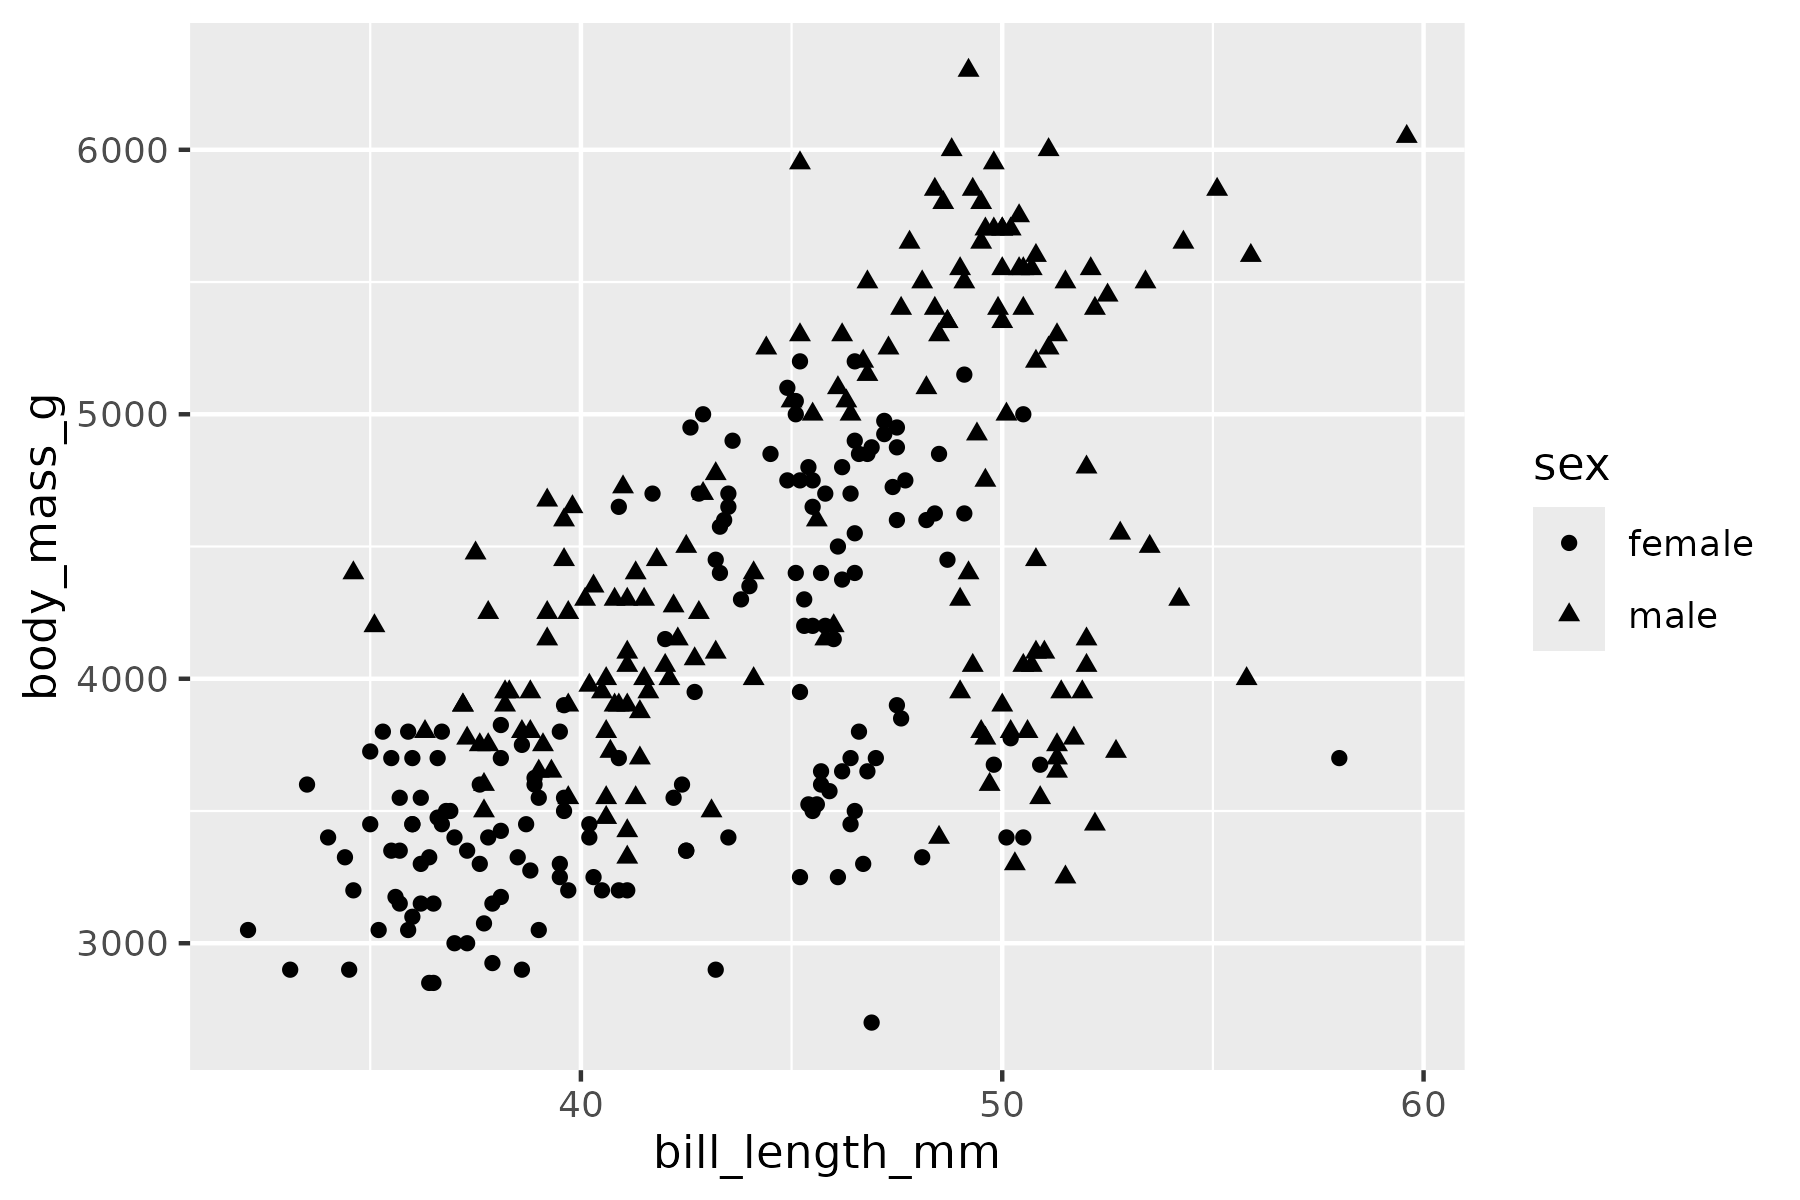
--group
Group observations for geoms like geom_line that connect points:
rush plot -x bill_length_mm -y body_mass_g --group species -g line -o plot-group.png penguins.csv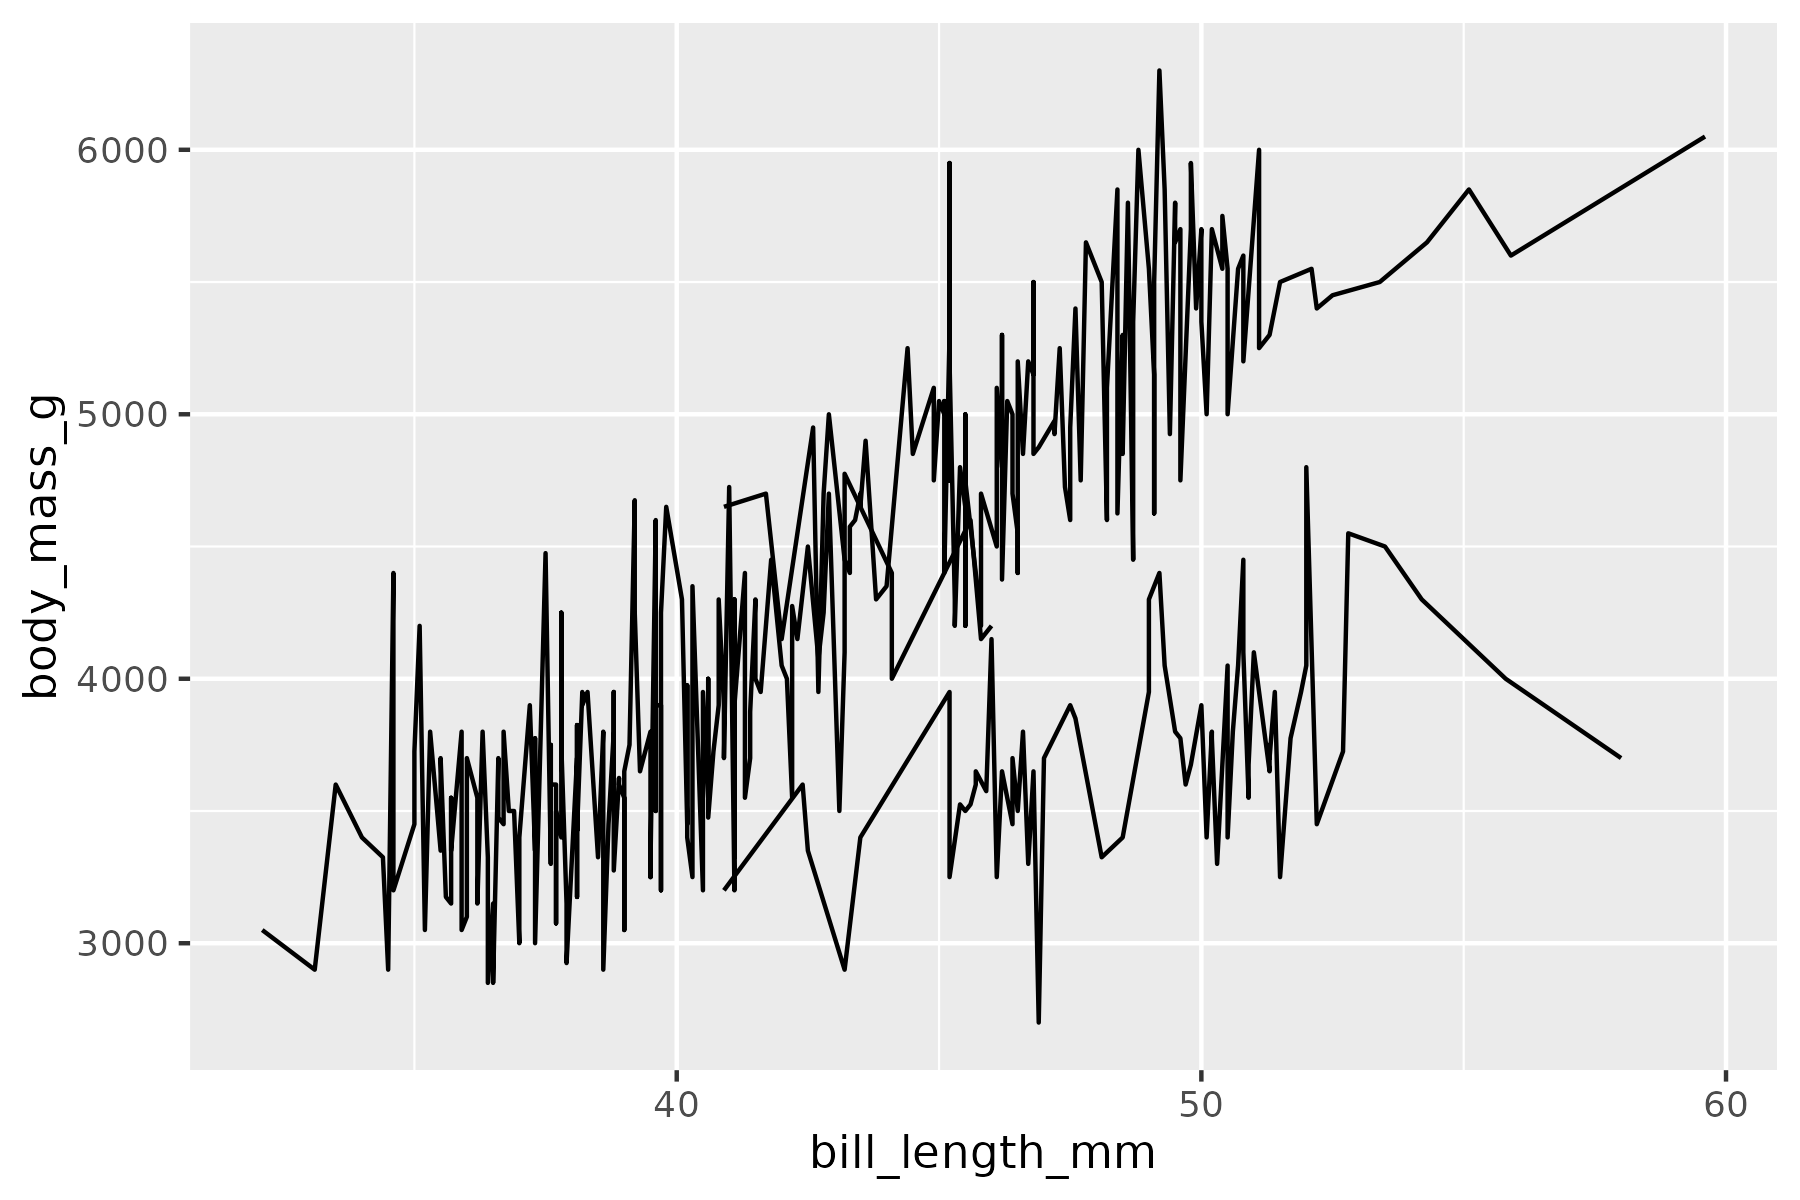
--aes
Pass additional aesthetics as key=value pairs:
rush plot -x bill_length_mm -y body_mass_g --aes "label=species" -g text -o plot-aes.png penguins.csv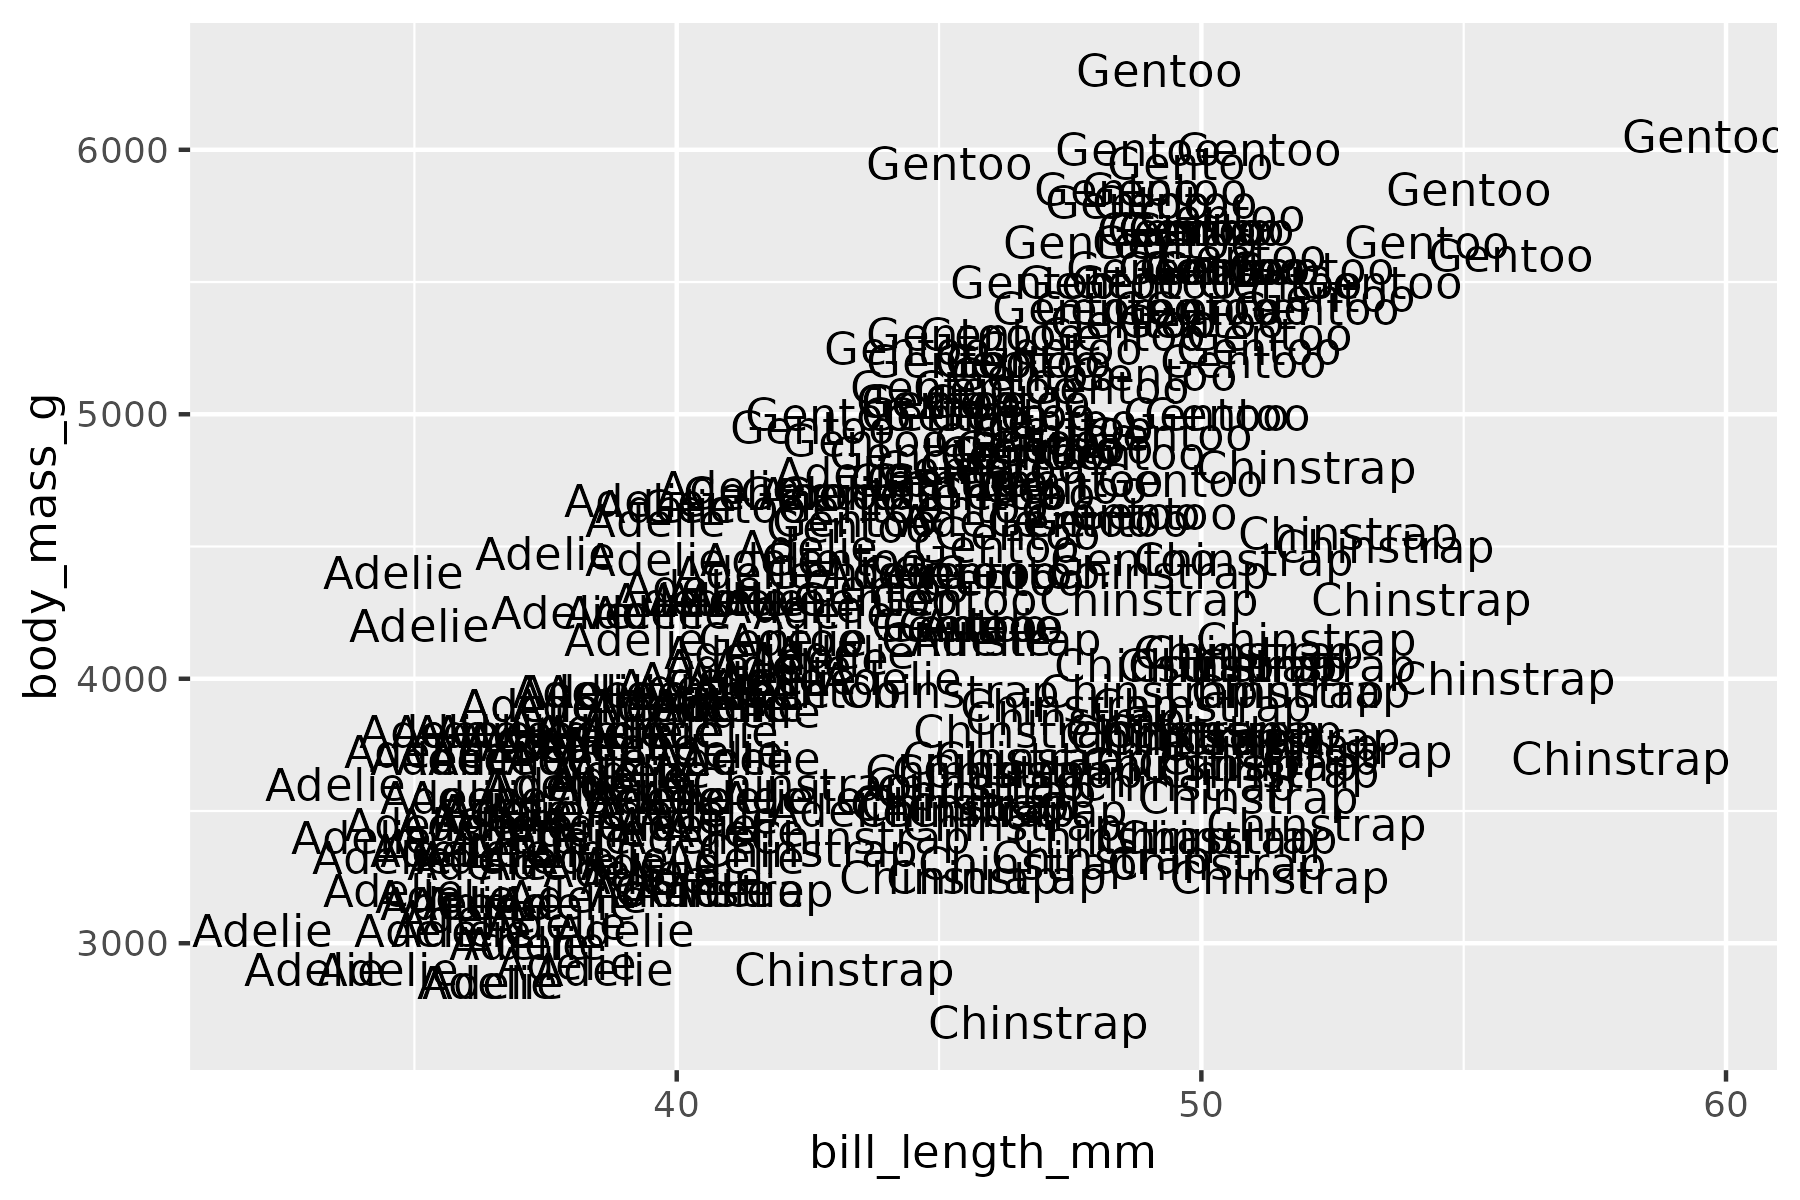
Axis and labels
--log
Log-transform axes. Accepts x, y, or xy:
rush plot -x body_mass_g -y bill_length_mm --log x -o plot-log.png penguins.csv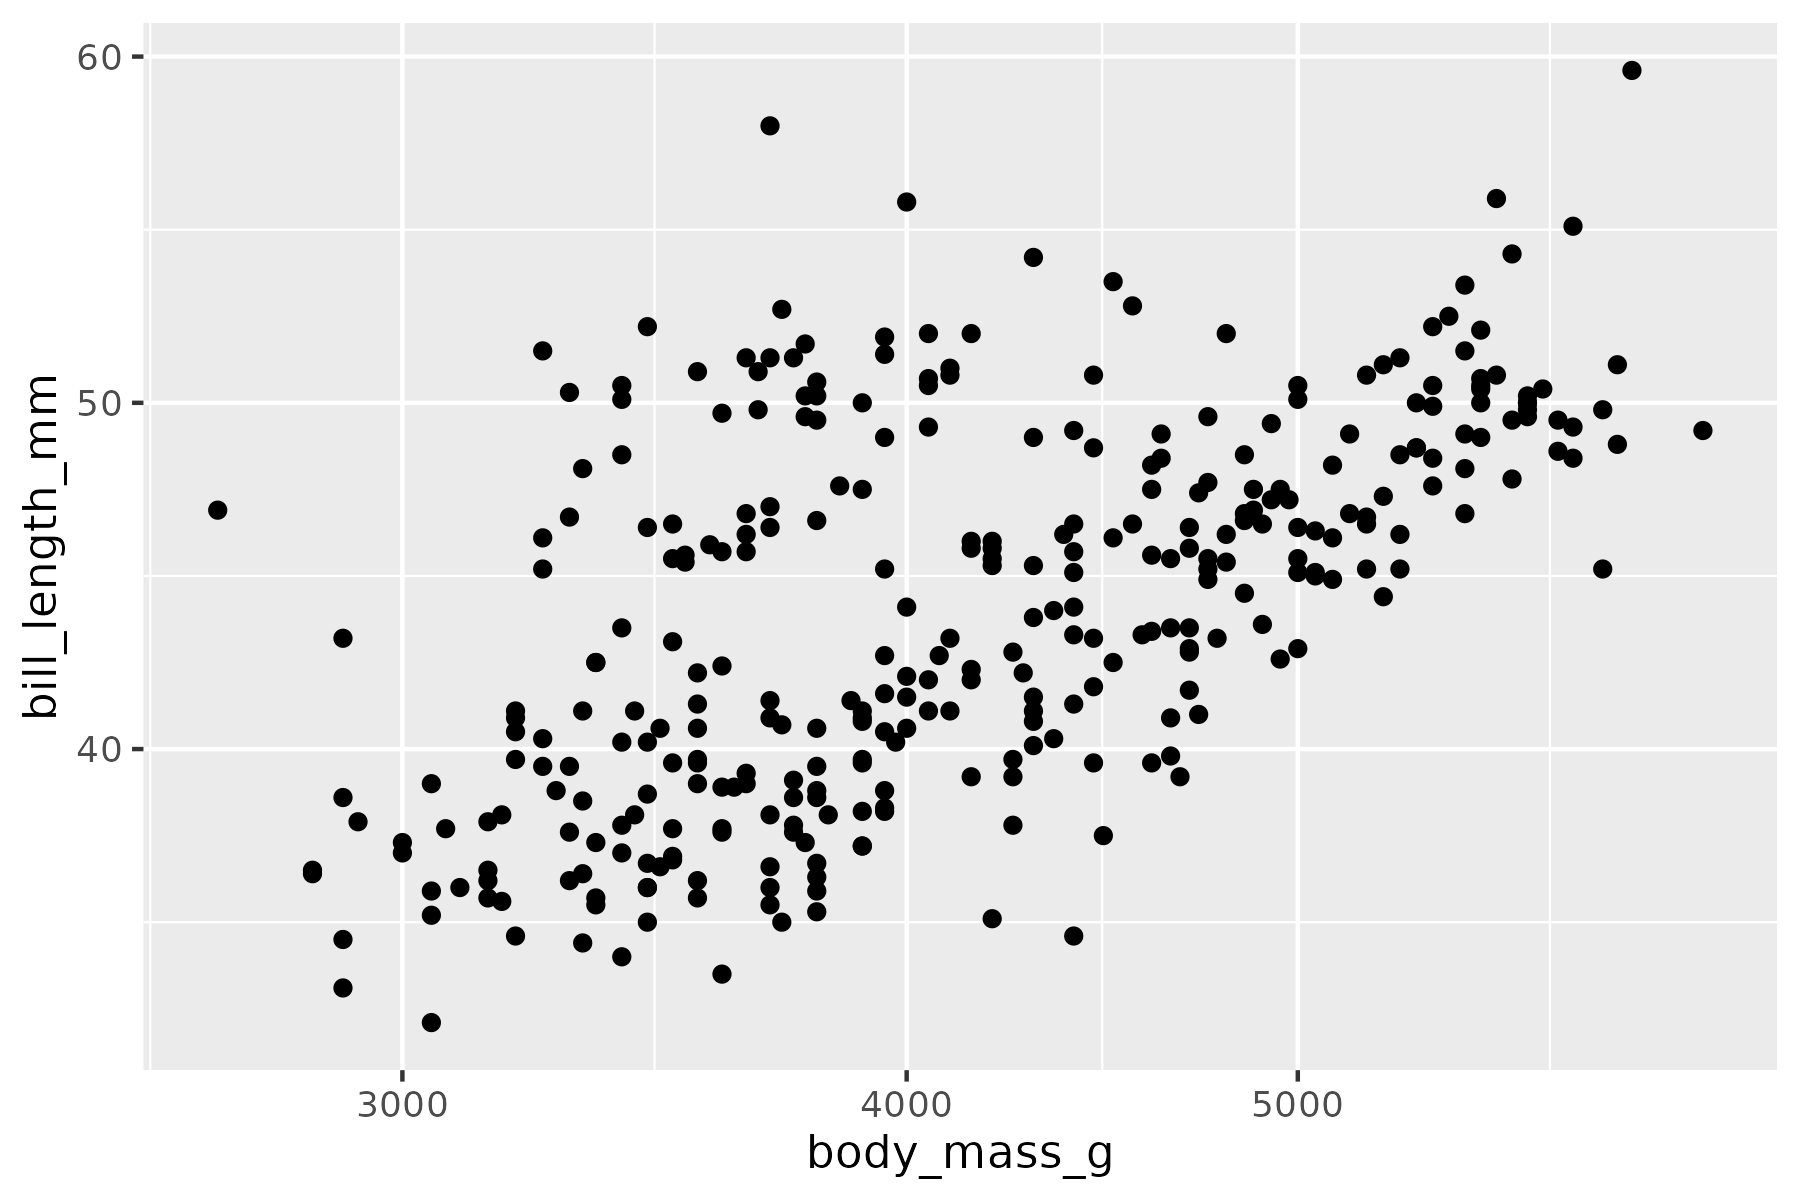
--title, --xlab, --ylab
Add axis labels and a title:
rush plot -x bill_length_mm -y body_mass_g --title "Bill Length vs Body Mass" --xlab "Bill length (mm)" --ylab "Body mass (g)" -o plot-labels.png penguins.csv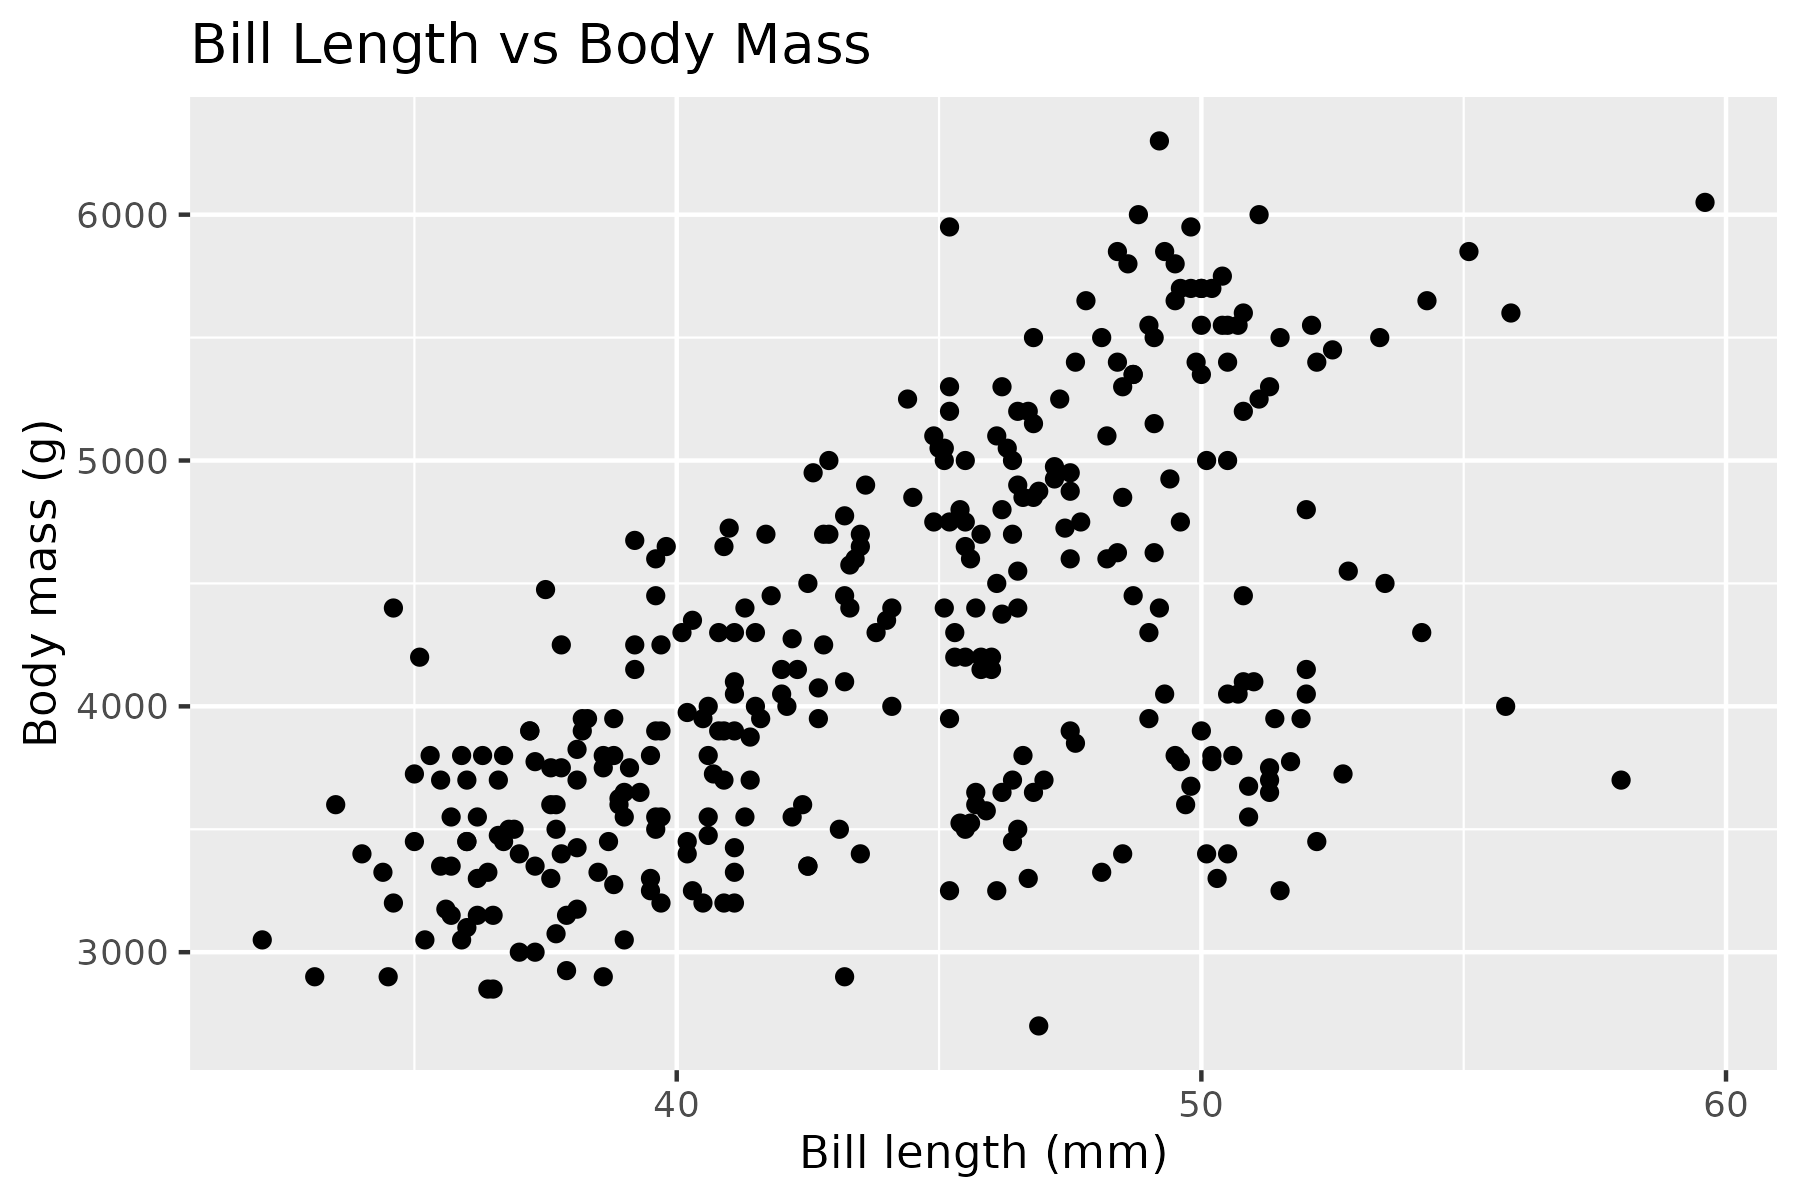
Facets
One-sided formula (facet_wrap)
rush plot -x bill_length_mm -y body_mass_g --facets '~ species' -o plot-facet-wrap.png penguins.csv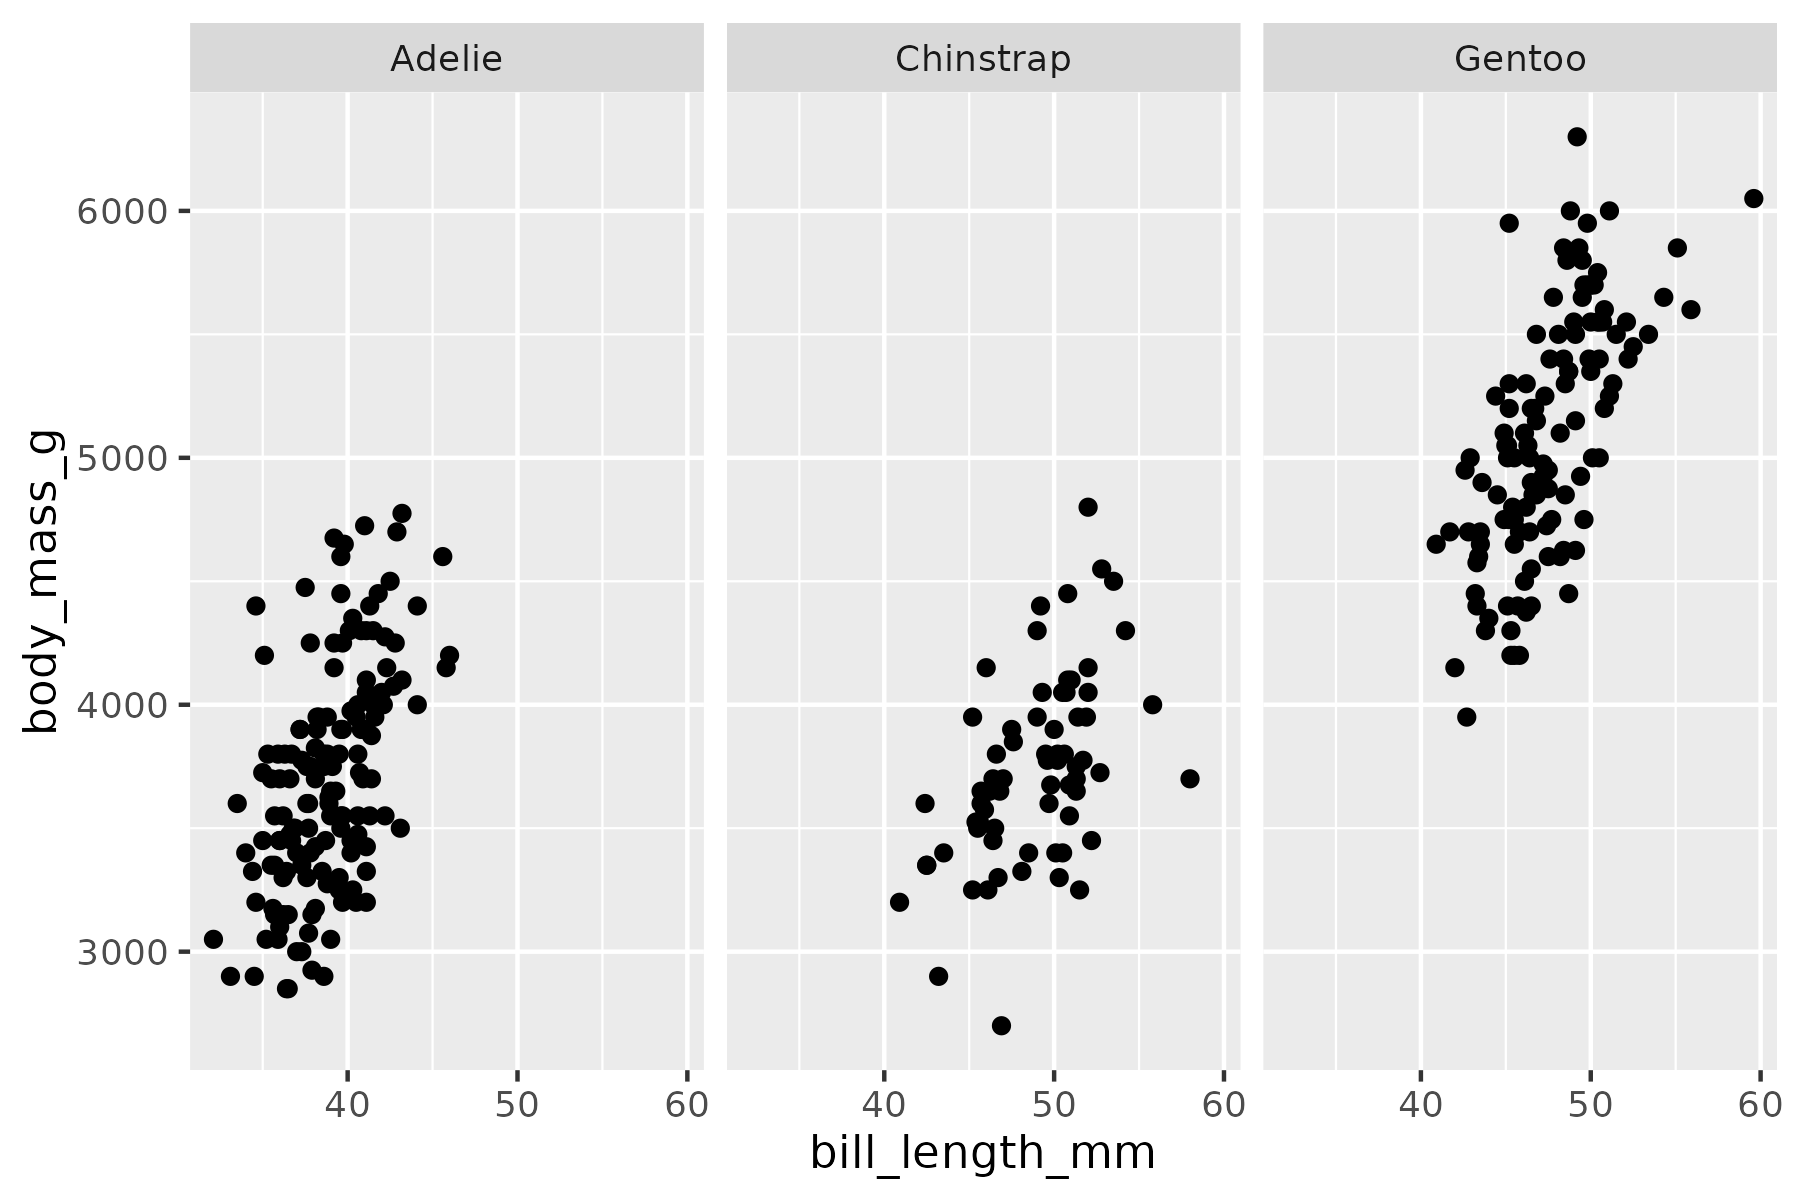
Two-sided formula (facet_grid) + --margins
rush plot -x bill_length_mm -y body_mass_g --facets 'sex ~ species' --margins -o plot-facet-grid.png penguins.csv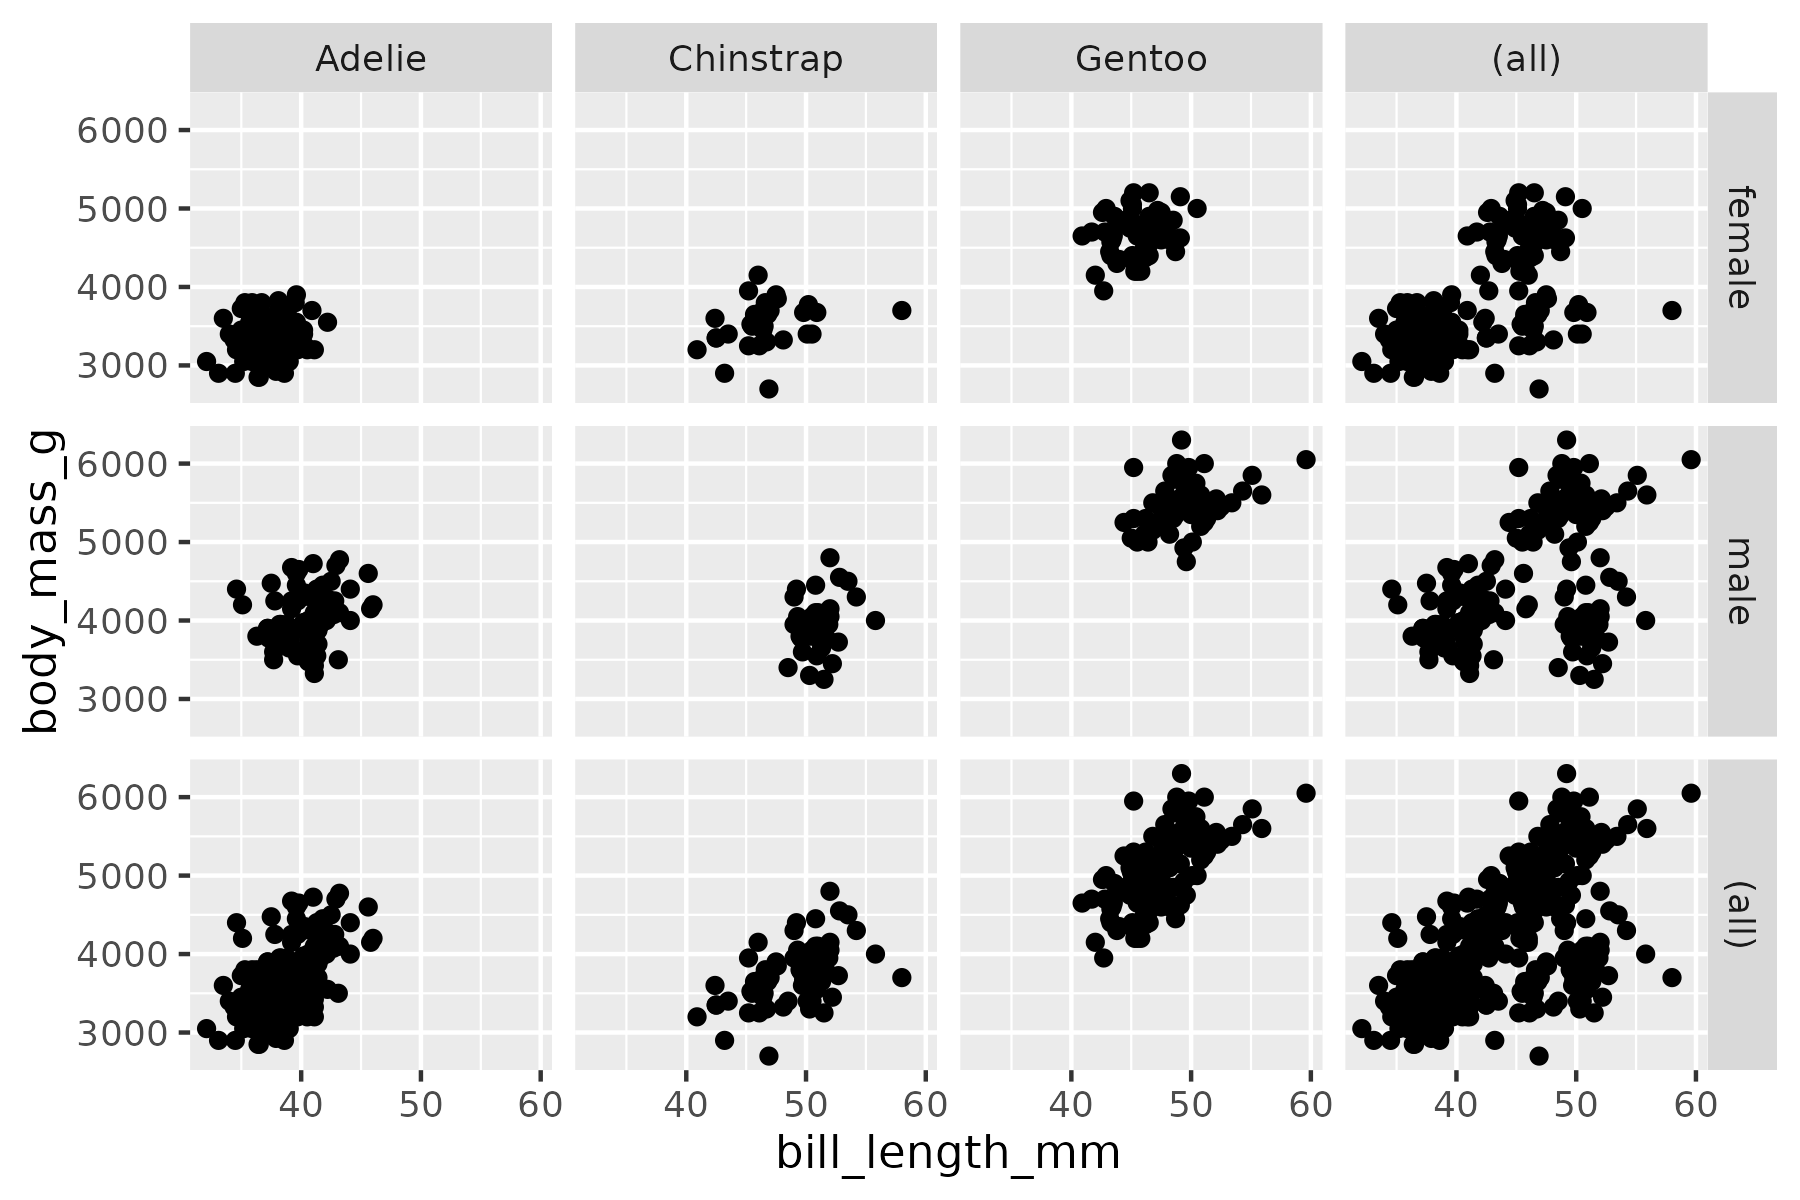
Pre- and post-processing
--pre
Run code before the plot is built. Useful for data transformations:
rush plot -x species -y mean_mass --pre 'df <- df |> dplyr::summarise(mean_mass = mean(body_mass_g), .by = species)' -g col -o plot-pre.png penguins.csv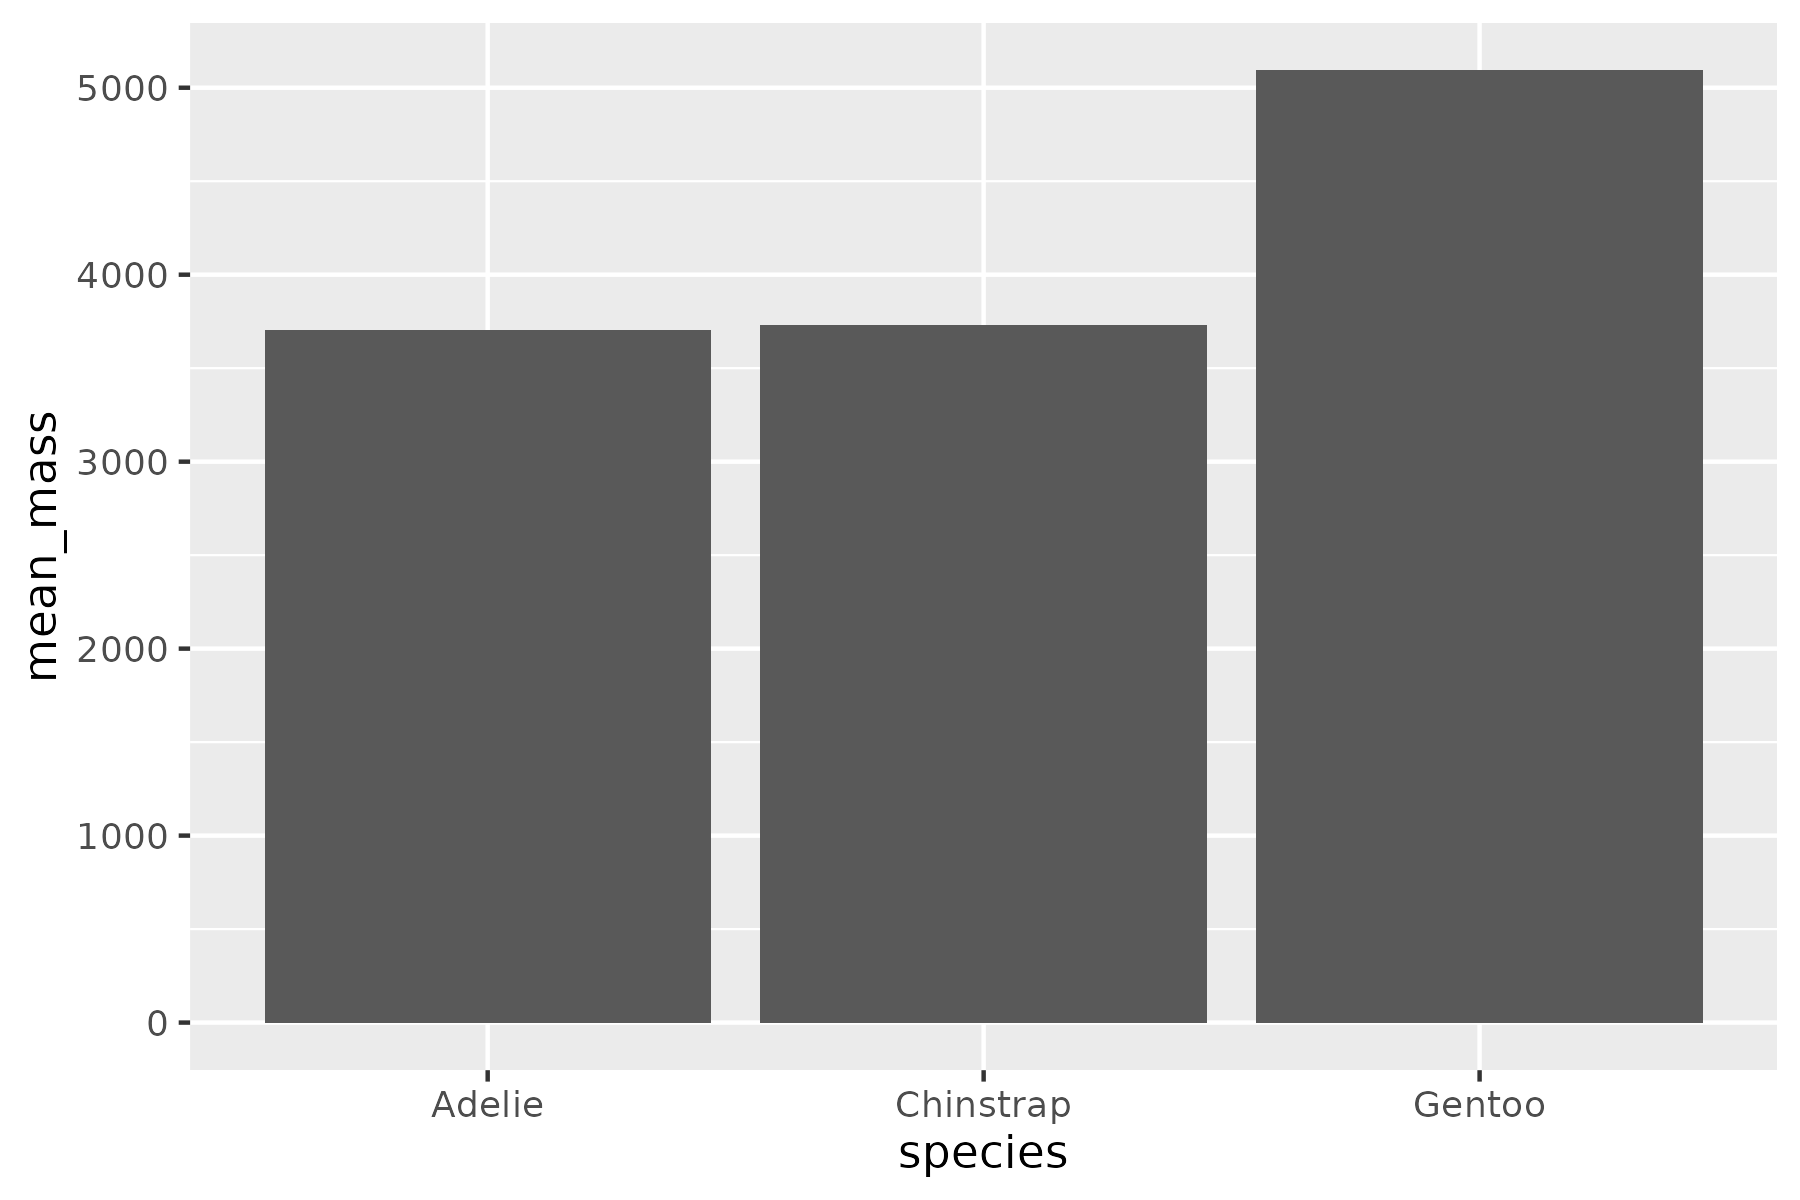
--post
Run code after the plot is built. The plot object is available as p:
rush plot -x bill_length_mm -y body_mass_g --post 'p + ggplot2::theme_minimal() + ggplot2::geom_smooth(method = "lm")' -o plot-post.png penguins.csv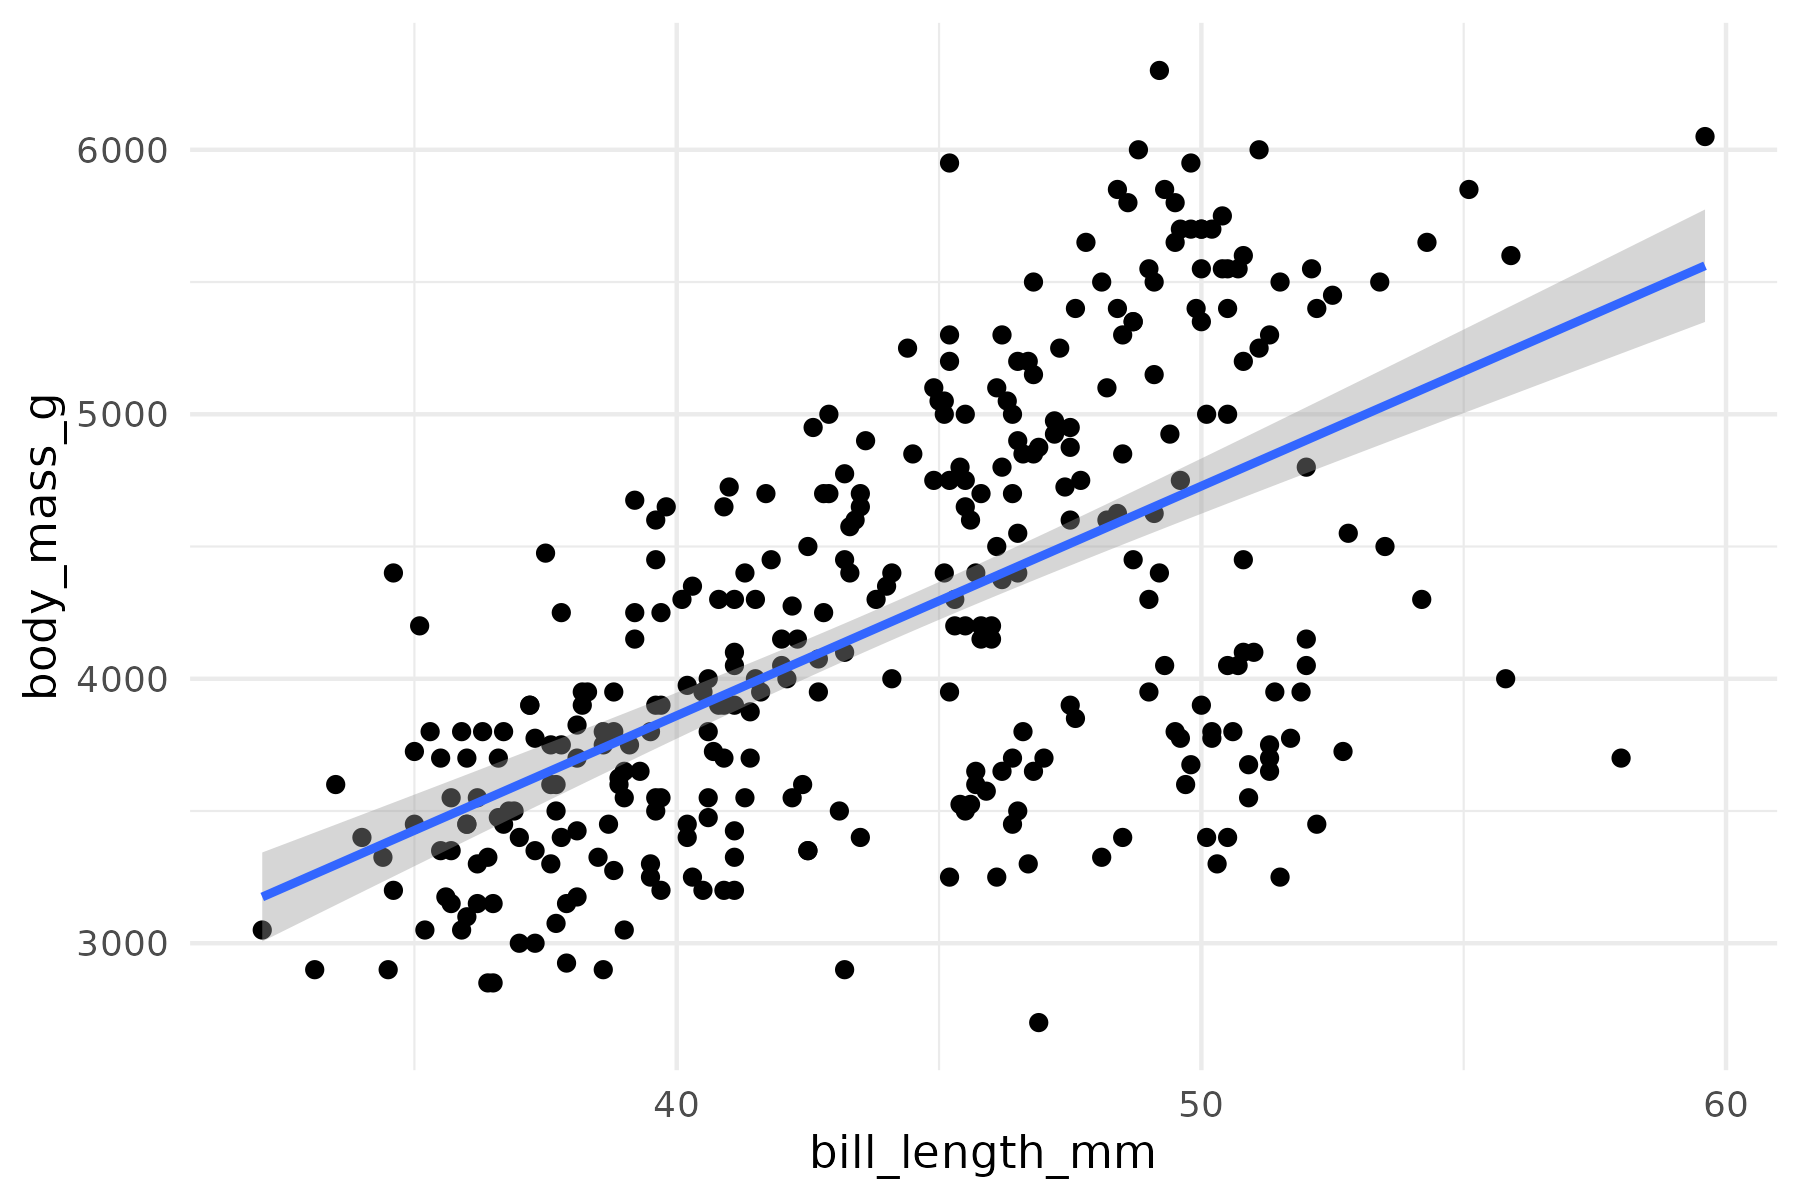
Terminal output
When no --output is given and stdout is connected to a terminal, rush renders the plot using devoutansi. Use -O ascii for plain-text output or -O ansi for colored output with ANSI escape codes:
rush plot -x bill_length_mm -y body_mass_g -O ascii --width 70 penguins.csv
#> [48;5;231m[38;5;231m [48;5;231m[38;5;231m [48;5;231m[38;5;231m [48;5;231m[38;5;231m [48;5;231m[38;5;231m [48;5;231m[38;5;231m [48;5;231m[38;5;231m [48;5;231m[38;5;231m [48;5;231m[38;5;231m [48;5;231m[38;5;231m [48;5;231m[38;5;231m [48;5;231m[38;5;231m [48;5;231m[38;5;231m [48;5;231m[38;5;231m [48;5;231m[38;5;231m [48;5;231m[38;5;231m [48;5;231m[38;5;231m [48;5;231m[38;5;231m [48;5;231m[38;5;231m [48;5;231m[38;5;231m [48;5;231m[38;5;231m [48;5;231m[38;5;231m [48;5;231m[38;5;231m [48;5;231m[38;5;231m [48;5;231m[38;5;231m [48;5;231m[38;5;231m [48;5;231m[38;5;231m [48;5;231m[38;5;231m [48;5;231m[38;5;231m [48;5;231m[38;5;231m [48;5;231m[38;5;231m [48;5;231m[38;5;231m [48;5;231m[38;5;231m [48;5;231m[38;5;231m [48;5;231m[38;5;231m [48;5;231m[38;5;231m [48;5;231m[38;5;231m [48;5;231m[38;5;231m [48;5;231m[38;5;231m [48;5;231m[38;5;231m [48;5;231m[38;5;231m [48;5;231m[38;5;231m [48;5;231m[38;5;231m [48;5;231m[38;5;231m [48;5;232m[38;5;232m@[48;5;231m[38;5;231m [48;5;231m[38;5;231m [48;5;231m[38;5;231m [48;5;231m[38;5;231m [48;5;231m[38;5;231m [48;5;231m[38;5;231m [48;5;231m[38;5;231m [48;5;231m[38;5;231m [48;5;231m[38;5;231m [48;5;231m[38;5;231m [48;5;231m[38;5;231m [48;5;231m[38;5;231m [48;5;231m[38;5;231m [48;5;231m[38;5;231m [48;5;231m[38;5;231m [48;5;231m[38;5;231m [48;5;231m[38;5;231m [48;5;231m[38;5;231m [48;5;231m[38;5;231m [48;5;231m[38;5;231m [48;5;231m[38;5;231m [48;5;232m[38;5;232m@[48;5;231m[38;5;231m [48;5;231m[38;5;231m [48;5;231m[38;5;231m [39m[49m
#> [48;5;231m[38;5;231m [48;5;231m[38;5;231m [48;5;231m[38;5;239m6[48;5;231m[38;5;239m0[48;5;231m[38;5;239m0[48;5;231m[38;5;239m0[48;5;231m[38;5;231m [48;5;231m[38;5;231m [48;5;231m[38;5;231m [48;5;231m[38;5;231m [48;5;231m[38;5;231m [48;5;231m[38;5;231m [48;5;231m[38;5;231m [48;5;231m[38;5;231m [48;5;231m[38;5;231m [48;5;231m[38;5;231m [48;5;231m[38;5;231m [48;5;231m[38;5;231m [48;5;231m[38;5;231m [48;5;231m[38;5;231m [48;5;231m[38;5;231m [48;5;231m[38;5;231m [48;5;231m[38;5;231m [48;5;231m[38;5;231m [48;5;231m[38;5;231m [48;5;231m[38;5;231m [48;5;231m[38;5;231m [48;5;231m[38;5;231m [48;5;231m[38;5;231m [48;5;231m[38;5;231m [48;5;231m[38;5;231m [48;5;231m[38;5;231m [48;5;231m[38;5;231m [48;5;231m[38;5;231m [48;5;231m[38;5;231m [48;5;231m[38;5;231m [48;5;232m[38;5;232m@[48;5;231m[38;5;231m [48;5;231m[38;5;231m [48;5;231m[38;5;231m [48;5;231m[38;5;231m [48;5;231m[38;5;231m [48;5;232m[38;5;232m@[48;5;232m[38;5;232m@[48;5;232m[38;5;232m@[48;5;232m[38;5;232m@[48;5;232m[38;5;232m@[48;5;232m[38;5;232m@[48;5;232m[38;5;232m@[48;5;231m[38;5;231m [48;5;231m[38;5;231m [48;5;231m[38;5;231m [48;5;231m[38;5;231m [48;5;231m[38;5;231m [48;5;231m[38;5;231m [48;5;231m[38;5;231m [48;5;231m[38;5;231m [48;5;232m[38;5;232m@[48;5;231m[38;5;231m [48;5;231m[38;5;231m [48;5;231m[38;5;231m [48;5;231m[38;5;231m [48;5;231m[38;5;231m [48;5;231m[38;5;231m [48;5;231m[38;5;231m [48;5;231m[38;5;231m [48;5;231m[38;5;231m [48;5;231m[38;5;231m [48;5;231m[38;5;231m [48;5;231m[38;5;231m [39m[49m
#> [48;5;231m[38;5;231m [48;5;231m[38;5;231m [48;5;231m[38;5;231m [48;5;231m[38;5;231m [48;5;231m[38;5;231m [48;5;231m[38;5;231m [48;5;231m[38;5;231m [48;5;231m[38;5;231m [48;5;231m[38;5;231m [48;5;231m[38;5;231m [48;5;231m[38;5;231m [48;5;231m[38;5;231m [48;5;231m[38;5;231m [48;5;231m[38;5;231m [48;5;231m[38;5;231m [48;5;231m[38;5;231m [48;5;231m[38;5;231m [48;5;231m[38;5;231m [48;5;231m[38;5;231m [48;5;231m[38;5;231m [48;5;231m[38;5;231m [48;5;231m[38;5;231m [48;5;231m[38;5;231m [48;5;231m[38;5;231m [48;5;231m[38;5;231m [48;5;231m[38;5;231m [48;5;231m[38;5;231m [48;5;231m[38;5;231m [48;5;231m[38;5;231m [48;5;231m[38;5;231m [48;5;231m[38;5;231m [48;5;231m[38;5;231m [48;5;231m[38;5;231m [48;5;231m[38;5;231m [48;5;231m[38;5;231m [48;5;231m[38;5;231m [48;5;231m[38;5;231m [48;5;231m[38;5;231m [48;5;231m[38;5;231m [48;5;232m[38;5;232m@[48;5;231m[38;5;231m [48;5;232m[38;5;232m@[48;5;232m[38;5;232m@[48;5;231m[38;5;231m [48;5;232m[38;5;232m@[48;5;232m[38;5;232m@[48;5;232m[38;5;232m@[48;5;232m[38;5;232m@[48;5;232m[38;5;232m@[48;5;232m[38;5;232m@[48;5;232m[38;5;232m@[48;5;232m[38;5;232m@[48;5;231m[38;5;231m [48;5;232m[38;5;232m@[48;5;231m[38;5;231m [48;5;232m[38;5;232m@[48;5;231m[38;5;231m [48;5;231m[38;5;231m [48;5;232m[38;5;232m@[48;5;231m[38;5;231m [48;5;231m[38;5;231m [48;5;231m[38;5;231m [48;5;231m[38;5;231m [48;5;231m[38;5;231m [48;5;231m[38;5;231m [48;5;231m[38;5;231m [48;5;231m[38;5;231m [48;5;231m[38;5;231m [48;5;231m[38;5;231m [48;5;231m[38;5;231m [39m[49m
#> [48;5;231m[38;5;232mb[48;5;231m[38;5;231m [48;5;231m[38;5;231m [48;5;231m[38;5;231m [48;5;231m[38;5;231m [48;5;231m[38;5;231m [48;5;231m[38;5;231m [48;5;231m[38;5;231m [48;5;231m[38;5;231m [48;5;231m[38;5;231m [48;5;231m[38;5;231m [48;5;231m[38;5;231m [48;5;231m[38;5;231m [48;5;231m[38;5;231m [48;5;231m[38;5;231m [48;5;231m[38;5;231m [48;5;231m[38;5;231m [48;5;231m[38;5;231m [48;5;231m[38;5;231m [48;5;231m[38;5;231m [48;5;231m[38;5;231m [48;5;231m[38;5;231m [48;5;231m[38;5;231m [48;5;231m[38;5;231m [48;5;231m[38;5;231m [48;5;231m[38;5;231m [48;5;231m[38;5;231m [48;5;231m[38;5;231m [48;5;231m[38;5;231m [48;5;231m[38;5;231m [48;5;231m[38;5;231m [48;5;231m[38;5;231m [48;5;231m[38;5;231m [48;5;231m[38;5;231m [48;5;232m[38;5;232m@[48;5;232m[38;5;232m@[48;5;232m[38;5;232m@[48;5;231m[38;5;231m [48;5;232m[38;5;232m@[48;5;232m[38;5;232m@[48;5;232m[38;5;232m@[48;5;231m[38;5;231m [48;5;232m[38;5;232m@[48;5;232m[38;5;232m@[48;5;232m[38;5;232m@[48;5;231m[38;5;231m [48;5;232m[38;5;232m@[48;5;231m[38;5;231m [48;5;232m[38;5;232m@[48;5;232m[38;5;232m@[48;5;231m[38;5;231m [48;5;231m[38;5;231m [48;5;231m[38;5;231m [48;5;231m[38;5;231m [48;5;231m[38;5;231m [48;5;231m[38;5;231m [48;5;231m[38;5;231m [48;5;231m[38;5;231m [48;5;231m[38;5;231m [48;5;231m[38;5;231m [48;5;231m[38;5;231m [48;5;231m[38;5;231m [48;5;231m[38;5;231m [48;5;231m[38;5;231m [48;5;231m[38;5;231m [48;5;231m[38;5;231m [48;5;231m[38;5;231m [48;5;231m[38;5;231m [48;5;231m[38;5;231m [48;5;231m[38;5;231m [39m[49m
#> [48;5;231m[38;5;232mo[48;5;231m[38;5;231m [48;5;231m[38;5;239m5[48;5;231m[38;5;239m0[48;5;231m[38;5;239m0[48;5;231m[38;5;239m0[48;5;231m[38;5;231m [48;5;231m[38;5;231m [48;5;231m[38;5;231m [48;5;231m[38;5;231m [48;5;231m[38;5;231m [48;5;231m[38;5;231m [48;5;231m[38;5;231m [48;5;231m[38;5;231m [48;5;231m[38;5;231m [48;5;231m[38;5;231m [48;5;231m[38;5;231m [48;5;231m[38;5;231m [48;5;231m[38;5;231m [48;5;231m[38;5;231m [48;5;231m[38;5;231m [48;5;231m[38;5;231m [48;5;231m[38;5;231m [48;5;231m[38;5;231m [48;5;231m[38;5;231m [48;5;231m[38;5;231m [48;5;231m[38;5;231m [48;5;231m[38;5;231m [48;5;231m[38;5;231m [48;5;231m[38;5;231m [48;5;232m[38;5;232m@[48;5;232m[38;5;232m@[48;5;232m[38;5;232m@[48;5;231m[38;5;231m [48;5;232m[38;5;232m@[48;5;232m[38;5;232m@[48;5;232m[38;5;232m@[48;5;231m[38;5;231m [48;5;232m[38;5;232m@[48;5;232m[38;5;232m@[48;5;232m[38;5;232m@[48;5;232m[38;5;232m@[48;5;231m[38;5;231m [48;5;232m[38;5;232m@[48;5;231m[38;5;231m [48;5;232m[38;5;232m@[48;5;232m[38;5;232m@[48;5;232m[38;5;232m@[48;5;231m[38;5;231m [48;5;231m[38;5;231m [48;5;232m[38;5;232m@[48;5;231m[38;5;231m [48;5;231m[38;5;231m [48;5;231m[38;5;231m [48;5;231m[38;5;231m [48;5;231m[38;5;231m [48;5;231m[38;5;231m [48;5;231m[38;5;231m [48;5;231m[38;5;231m [48;5;231m[38;5;231m [48;5;231m[38;5;231m [48;5;231m[38;5;231m [48;5;231m[38;5;231m [48;5;231m[38;5;231m [48;5;231m[38;5;231m [48;5;231m[38;5;231m [48;5;231m[38;5;231m [48;5;231m[38;5;231m [48;5;231m[38;5;231m [48;5;231m[38;5;231m [39m[49m
#> [48;5;231m[38;5;232md[48;5;231m[38;5;231m [48;5;231m[38;5;231m [48;5;231m[38;5;231m [48;5;231m[38;5;231m [48;5;231m[38;5;231m [48;5;231m[38;5;231m [48;5;231m[38;5;231m [48;5;231m[38;5;231m [48;5;231m[38;5;231m [48;5;231m[38;5;231m [48;5;231m[38;5;231m [48;5;231m[38;5;231m [48;5;231m[38;5;231m [48;5;231m[38;5;231m [48;5;231m[38;5;231m [48;5;231m[38;5;231m [48;5;231m[38;5;231m [48;5;231m[38;5;231m [48;5;231m[38;5;231m [48;5;232m[38;5;232m@[48;5;231m[38;5;231m [48;5;231m[38;5;231m [48;5;232m[38;5;232m@[48;5;232m[38;5;232m@[48;5;231m[38;5;231m [48;5;231m[38;5;231m [48;5;232m[38;5;232m@[48;5;232m[38;5;232m@[48;5;232m[38;5;232m@[48;5;232m[38;5;232m@[48;5;232m[38;5;232m@[48;5;232m[38;5;232m@[48;5;231m[38;5;231m [48;5;231m[38;5;231m [48;5;231m[38;5;231m [48;5;232m[38;5;232m@[48;5;232m[38;5;232m@[48;5;232m[38;5;232m@[48;5;232m[38;5;232m@[48;5;232m[38;5;232m@[48;5;232m[38;5;232m@[48;5;232m[38;5;232m@[48;5;232m[38;5;232m@[48;5;232m[38;5;232m@[48;5;231m[38;5;231m [48;5;231m[38;5;231m [48;5;231m[38;5;231m [48;5;232m[38;5;232m@[48;5;231m[38;5;231m [48;5;231m[38;5;231m [48;5;231m[38;5;231m [48;5;232m[38;5;232m@[48;5;232m[38;5;232m@[48;5;231m[38;5;231m [48;5;231m[38;5;231m [48;5;231m[38;5;231m [48;5;231m[38;5;231m [48;5;231m[38;5;231m [48;5;231m[38;5;231m [48;5;231m[38;5;231m [48;5;231m[38;5;231m [48;5;231m[38;5;231m [48;5;231m[38;5;231m [48;5;231m[38;5;231m [48;5;231m[38;5;231m [48;5;231m[38;5;231m [48;5;231m[38;5;231m [48;5;231m[38;5;231m [48;5;231m[38;5;231m [39m[49m
#> [48;5;231m[38;5;232my[48;5;231m[38;5;231m [48;5;231m[38;5;231m [48;5;231m[38;5;231m [48;5;231m[38;5;231m [48;5;231m[38;5;231m [48;5;231m[38;5;231m [48;5;231m[38;5;231m [48;5;231m[38;5;231m [48;5;231m[38;5;231m [48;5;231m[38;5;231m [48;5;231m[38;5;231m [48;5;231m[38;5;231m [48;5;232m[38;5;232m@[48;5;231m[38;5;231m [48;5;232m[38;5;232m@[48;5;231m[38;5;231m [48;5;231m[38;5;231m [48;5;231m[38;5;231m [48;5;231m[38;5;231m [48;5;232m[38;5;232m@[48;5;231m[38;5;231m [48;5;231m[38;5;231m [48;5;232m[38;5;232m@[48;5;232m[38;5;232m@[48;5;232m[38;5;232m@[48;5;231m[38;5;231m [48;5;232m[38;5;232m@[48;5;232m[38;5;232m@[48;5;232m[38;5;232m@[48;5;232m[38;5;232m@[48;5;232m[38;5;232m@[48;5;232m[38;5;232m@[48;5;232m[38;5;232m@[48;5;231m[38;5;231m [48;5;231m[38;5;231m [48;5;232m[38;5;232m@[48;5;232m[38;5;232m@[48;5;232m[38;5;232m@[48;5;232m[38;5;232m@[48;5;231m[38;5;231m [48;5;231m[38;5;231m [48;5;231m[38;5;231m [48;5;231m[38;5;231m [48;5;232m[38;5;232m@[48;5;231m[38;5;231m [48;5;231m[38;5;231m [48;5;231m[38;5;231m [48;5;231m[38;5;231m [48;5;231m[38;5;231m [48;5;232m[38;5;232m@[48;5;231m[38;5;231m [48;5;231m[38;5;231m [48;5;231m[38;5;231m [48;5;231m[38;5;231m [48;5;232m[38;5;232m@[48;5;231m[38;5;231m [48;5;231m[38;5;231m [48;5;231m[38;5;231m [48;5;231m[38;5;231m [48;5;231m[38;5;231m [48;5;231m[38;5;231m [48;5;231m[38;5;231m [48;5;231m[38;5;231m [48;5;231m[38;5;231m [48;5;231m[38;5;231m [48;5;231m[38;5;231m [48;5;231m[38;5;231m [48;5;231m[38;5;231m [48;5;231m[38;5;231m [39m[49m
#> [48;5;231m[38;5;232m_[48;5;231m[38;5;231m [48;5;231m[38;5;239m4[48;5;231m[38;5;239m0[48;5;231m[38;5;239m0[48;5;231m[38;5;239m0[48;5;231m[38;5;231m [48;5;231m[38;5;231m [48;5;231m[38;5;231m [48;5;231m[38;5;231m [48;5;231m[38;5;231m [48;5;231m[38;5;231m [48;5;231m[38;5;231m [48;5;231m[38;5;231m [48;5;231m[38;5;231m [48;5;232m[38;5;232m@[48;5;232m[38;5;232m@[48;5;232m[38;5;232m@[48;5;232m[38;5;232m@[48;5;232m[38;5;232m@[48;5;231m[38;5;231m [48;5;232m[38;5;232m@[48;5;232m[38;5;232m@[48;5;231m[38;5;231m [48;5;232m[38;5;232m@[48;5;232m[38;5;232m@[48;5;232m[38;5;232m@[48;5;232m[38;5;232m@[48;5;232m[38;5;232m@[48;5;232m[38;5;232m@[48;5;231m[38;5;231m [48;5;232m[38;5;232m@[48;5;232m[38;5;232m@[48;5;232m[38;5;232m@[48;5;231m[38;5;231m [48;5;231m[38;5;231m [48;5;232m[38;5;232m@[48;5;231m[38;5;231m [48;5;231m[38;5;231m [48;5;232m[38;5;232m@[48;5;231m[38;5;231m [48;5;232m[38;5;232m@[48;5;231m[38;5;231m [48;5;231m[38;5;231m [48;5;232m[38;5;232m@[48;5;232m[38;5;232m@[48;5;232m[38;5;232m@[48;5;232m[38;5;232m@[48;5;232m[38;5;232m@[48;5;232m[38;5;232m@[48;5;232m[38;5;232m@[48;5;231m[38;5;231m [48;5;231m[38;5;231m [48;5;231m[38;5;231m [48;5;231m[38;5;231m [48;5;231m[38;5;231m [48;5;231m[38;5;231m [48;5;231m[38;5;231m [48;5;232m[38;5;232m@[48;5;231m[38;5;231m [48;5;231m[38;5;231m [48;5;231m[38;5;231m [48;5;231m[38;5;231m [48;5;231m[38;5;231m [48;5;231m[38;5;231m [48;5;231m[38;5;231m [48;5;231m[38;5;231m [48;5;231m[38;5;231m [48;5;231m[38;5;231m [48;5;231m[38;5;231m [39m[49m
#> [48;5;231m[38;5;232mm[48;5;231m[38;5;231m [48;5;231m[38;5;231m [48;5;231m[38;5;231m [48;5;231m[38;5;231m [48;5;231m[38;5;231m [48;5;231m[38;5;231m [48;5;231m[38;5;231m [48;5;231m[38;5;231m [48;5;231m[38;5;231m [48;5;231m[38;5;231m [48;5;232m[38;5;232m@[48;5;231m[38;5;231m [48;5;231m[38;5;231m [48;5;232m[38;5;232m@[48;5;232m[38;5;232m@[48;5;232m[38;5;232m@[48;5;232m[38;5;232m@[48;5;232m[38;5;232m@[48;5;232m[38;5;232m@[48;5;232m[38;5;232m@[48;5;232m[38;5;232m@[48;5;232m[38;5;232m@[48;5;232m[38;5;232m@[48;5;232m[38;5;232m@[48;5;231m[38;5;231m [48;5;232m[38;5;232m@[48;5;232m[38;5;232m@[48;5;232m[38;5;232m@[48;5;232m[38;5;232m@[48;5;232m[38;5;232m@[48;5;232m[38;5;232m@[48;5;231m[38;5;231m [48;5;231m[38;5;231m [48;5;231m[38;5;231m [48;5;231m[38;5;231m [48;5;232m[38;5;232m@[48;5;232m[38;5;232m@[48;5;232m[38;5;232m@[48;5;232m[38;5;232m@[48;5;232m[38;5;232m@[48;5;231m[38;5;231m [48;5;231m[38;5;231m [48;5;231m[38;5;231m [48;5;231m[38;5;231m [48;5;232m[38;5;232m@[48;5;232m[38;5;232m@[48;5;231m[38;5;231m [48;5;232m[38;5;232m@[48;5;232m[38;5;232m@[48;5;231m[38;5;231m [48;5;231m[38;5;231m [48;5;232m[38;5;232m@[48;5;231m[38;5;231m [48;5;231m[38;5;231m [48;5;231m[38;5;231m [48;5;231m[38;5;231m [48;5;231m[38;5;231m [48;5;231m[38;5;231m [48;5;231m[38;5;231m [48;5;231m[38;5;231m [48;5;231m[38;5;231m [48;5;231m[38;5;231m [48;5;232m[38;5;232m@[48;5;231m[38;5;231m [48;5;231m[38;5;231m [48;5;231m[38;5;231m [48;5;231m[38;5;231m [48;5;231m[38;5;231m [48;5;231m[38;5;231m [39m[49m
#> [48;5;231m[38;5;232ma[48;5;231m[38;5;231m [48;5;231m[38;5;231m [48;5;231m[38;5;231m [48;5;231m[38;5;231m [48;5;231m[38;5;231m [48;5;231m[38;5;231m [48;5;231m[38;5;231m [48;5;231m[38;5;231m [48;5;231m[38;5;231m [48;5;231m[38;5;231m [48;5;231m[38;5;231m [48;5;232m[38;5;232m@[48;5;232m[38;5;232m@[48;5;232m[38;5;232m@[48;5;232m[38;5;232m@[48;5;232m[38;5;232m@[48;5;232m[38;5;232m@[48;5;232m[38;5;232m@[48;5;232m[38;5;232m@[48;5;232m[38;5;232m@[48;5;232m[38;5;232m@[48;5;232m[38;5;232m@[48;5;231m[38;5;231m [48;5;232m[38;5;232m@[48;5;232m[38;5;232m@[48;5;232m[38;5;232m@[48;5;232m[38;5;232m@[48;5;231m[38;5;231m [48;5;231m[38;5;231m [48;5;232m[38;5;232m@[48;5;231m[38;5;231m [48;5;232m[38;5;232m@[48;5;231m[38;5;231m [48;5;231m[38;5;231m [48;5;231m[38;5;231m [48;5;232m[38;5;232m@[48;5;231m[38;5;231m [48;5;232m[38;5;232m@[48;5;232m[38;5;232m@[48;5;231m[38;5;231m [48;5;231m[38;5;231m [48;5;232m[38;5;232m@[48;5;232m[38;5;232m@[48;5;231m[38;5;231m [48;5;231m[38;5;231m [48;5;232m[38;5;232m@[48;5;232m[38;5;232m@[48;5;231m[38;5;231m [48;5;232m[38;5;232m@[48;5;232m[38;5;232m@[48;5;231m[38;5;231m [48;5;231m[38;5;231m [48;5;231m[38;5;231m [48;5;231m[38;5;231m [48;5;231m[38;5;231m [48;5;231m[38;5;231m [48;5;231m[38;5;231m [48;5;231m[38;5;231m [48;5;231m[38;5;231m [48;5;231m[38;5;231m [48;5;231m[38;5;231m [48;5;231m[38;5;231m [48;5;231m[38;5;231m [48;5;231m[38;5;231m [48;5;231m[38;5;231m [48;5;231m[38;5;231m [48;5;231m[38;5;231m [48;5;231m[38;5;231m [48;5;231m[38;5;231m [39m[49m
#> [48;5;231m[38;5;232ms[48;5;231m[38;5;231m [48;5;231m[38;5;239m3[48;5;231m[38;5;239m0[48;5;231m[38;5;239m0[48;5;231m[38;5;239m0[48;5;231m[38;5;231m [48;5;231m[38;5;231m [48;5;232m[38;5;232m@[48;5;231m[38;5;231m [48;5;232m[38;5;232m@[48;5;231m[38;5;231m [48;5;231m[38;5;231m [48;5;232m[38;5;232m@[48;5;231m[38;5;231m [48;5;232m[38;5;232m@[48;5;232m[38;5;232m@[48;5;232m[38;5;232m@[48;5;231m[38;5;231m [48;5;232m[38;5;232m@[48;5;232m[38;5;232m@[48;5;231m[38;5;231m [48;5;232m[38;5;232m@[48;5;232m[38;5;232m@[48;5;231m[38;5;231m [48;5;231m[38;5;231m [48;5;231m[38;5;231m [48;5;231m[38;5;231m [48;5;231m[38;5;231m [48;5;231m[38;5;231m [48;5;231m[38;5;231m [48;5;231m[38;5;231m [48;5;232m[38;5;232m@[48;5;231m[38;5;231m [48;5;231m[38;5;231m [48;5;231m[38;5;231m [48;5;231m[38;5;231m [48;5;231m[38;5;231m [48;5;231m[38;5;231m [48;5;231m[38;5;231m [48;5;231m[38;5;231m [48;5;231m[38;5;231m [48;5;231m[38;5;231m [48;5;231m[38;5;231m [48;5;231m[38;5;231m [48;5;231m[38;5;231m [48;5;231m[38;5;231m [48;5;231m[38;5;231m [48;5;231m[38;5;231m [48;5;231m[38;5;231m [48;5;231m[38;5;231m [48;5;231m[38;5;231m [48;5;231m[38;5;231m [48;5;231m[38;5;231m [48;5;231m[38;5;231m [48;5;231m[38;5;231m [48;5;231m[38;5;231m [48;5;231m[38;5;231m [48;5;231m[38;5;231m [48;5;231m[38;5;231m [48;5;231m[38;5;231m [48;5;231m[38;5;231m [48;5;231m[38;5;231m [48;5;231m[38;5;231m [48;5;231m[38;5;231m [48;5;231m[38;5;231m [48;5;231m[38;5;231m [48;5;231m[38;5;231m [48;5;231m[38;5;231m [48;5;231m[38;5;231m [39m[49m
#> [48;5;231m[38;5;232ms[48;5;231m[38;5;231m [48;5;231m[38;5;231m [48;5;231m[38;5;231m [48;5;231m[38;5;231m [48;5;231m[38;5;231m [48;5;231m[38;5;231m [48;5;231m[38;5;231m [48;5;231m[38;5;231m [48;5;231m[38;5;231m [48;5;231m[38;5;231m [48;5;231m[38;5;231m [48;5;231m[38;5;231m [48;5;231m[38;5;231m [48;5;231m[38;5;231m [48;5;231m[38;5;231m [48;5;231m[38;5;231m [48;5;231m[38;5;231m [48;5;231m[38;5;231m [48;5;231m[38;5;231m [48;5;231m[38;5;231m [48;5;231m[38;5;231m [48;5;231m[38;5;231m [48;5;231m[38;5;231m [48;5;231m[38;5;231m [48;5;231m[38;5;231m [48;5;231m[38;5;231m [48;5;231m[38;5;231m [48;5;231m[38;5;231m [48;5;231m[38;5;231m [48;5;231m[38;5;231m [48;5;231m[38;5;231m [48;5;231m[38;5;231m [48;5;231m[38;5;231m [48;5;231m[38;5;231m [48;5;231m[38;5;231m [48;5;231m[38;5;231m [48;5;231m[38;5;231m [48;5;231m[38;5;231m [48;5;232m[38;5;232m@[48;5;231m[38;5;231m [48;5;231m[38;5;231m [48;5;231m[38;5;231m [48;5;231m[38;5;231m [48;5;231m[38;5;231m [48;5;231m[38;5;231m [48;5;231m[38;5;231m [48;5;231m[38;5;231m [48;5;231m[38;5;231m [48;5;231m[38;5;231m [48;5;231m[38;5;231m [48;5;231m[38;5;231m [48;5;231m[38;5;231m [48;5;231m[38;5;231m [48;5;231m[38;5;231m [48;5;231m[38;5;231m [48;5;231m[38;5;231m [48;5;231m[38;5;231m [48;5;231m[38;5;231m [48;5;231m[38;5;231m [48;5;231m[38;5;231m [48;5;231m[38;5;231m [48;5;231m[38;5;231m [48;5;231m[38;5;231m [48;5;231m[38;5;231m [48;5;231m[38;5;231m [48;5;231m[38;5;231m [48;5;231m[38;5;231m [48;5;231m[38;5;231m [48;5;231m[38;5;231m [39m[49m
#> [48;5;231m[38;5;232m_[48;5;231m[38;5;231m [48;5;231m[38;5;231m [48;5;231m[38;5;231m [48;5;231m[38;5;231m [48;5;231m[38;5;231m [48;5;231m[38;5;231m [48;5;231m[38;5;231m [48;5;231m[38;5;231m [48;5;231m[38;5;231m [48;5;231m[38;5;231m [48;5;231m[38;5;231m [48;5;231m[38;5;231m [48;5;231m[38;5;231m [48;5;231m[38;5;231m [48;5;231m[38;5;231m [48;5;231m[38;5;231m [48;5;231m[38;5;231m [48;5;231m[38;5;231m [48;5;231m[38;5;231m [48;5;231m[38;5;231m [48;5;231m[38;5;231m [48;5;231m[38;5;231m [48;5;231m[38;5;231m [48;5;231m[38;5;239m4[48;5;231m[38;5;239m0[48;5;231m[38;5;231m [48;5;231m[38;5;231m [48;5;231m[38;5;231m [48;5;231m[38;5;231m [48;5;231m[38;5;231m [48;5;231m[38;5;231m [48;5;231m[38;5;231m [48;5;231m[38;5;231m [48;5;231m[38;5;231m [48;5;231m[38;5;231m [48;5;231m[38;5;231m [48;5;231m[38;5;231m [48;5;231m[38;5;231m [48;5;231m[38;5;231m [48;5;231m[38;5;231m [48;5;231m[38;5;231m [48;5;231m[38;5;231m [48;5;231m[38;5;231m [48;5;231m[38;5;231m [48;5;231m[38;5;239m5[48;5;231m[38;5;239m0[48;5;231m[38;5;231m [48;5;231m[38;5;231m [48;5;231m[38;5;231m [48;5;231m[38;5;231m [48;5;231m[38;5;231m [48;5;231m[38;5;231m [48;5;231m[38;5;231m [48;5;231m[38;5;231m [48;5;231m[38;5;231m [48;5;231m[38;5;231m [48;5;231m[38;5;231m [48;5;231m[38;5;231m [48;5;231m[38;5;231m [48;5;231m[38;5;231m [48;5;231m[38;5;231m [48;5;231m[38;5;231m [48;5;231m[38;5;231m [48;5;231m[38;5;231m [48;5;231m[38;5;231m [48;5;231m[38;5;239m6[48;5;231m[38;5;239m0[48;5;231m[38;5;231m [48;5;231m[38;5;231m [39m[49m
#> [48;5;231m[38;5;232mg[48;5;231m[38;5;231m [48;5;231m[38;5;231m [48;5;231m[38;5;231m [48;5;231m[38;5;231m [48;5;231m[38;5;231m [48;5;231m[38;5;231m [48;5;231m[38;5;231m [48;5;231m[38;5;231m [48;5;231m[38;5;231m [48;5;231m[38;5;231m [48;5;231m[38;5;231m [48;5;231m[38;5;231m [48;5;231m[38;5;231m [48;5;231m[38;5;231m [48;5;231m[38;5;231m [48;5;231m[38;5;231m [48;5;231m[38;5;231m [48;5;231m[38;5;231m [48;5;231m[38;5;231m [48;5;231m[38;5;231m [48;5;231m[38;5;231m [48;5;231m[38;5;231m [48;5;231m[38;5;231m [48;5;231m[38;5;231m [48;5;231m[38;5;231m [48;5;231m[38;5;231m [48;5;231m[38;5;231m [48;5;231m[38;5;231m [48;5;231m[38;5;231m [48;5;231m[38;5;232mb[48;5;231m[38;5;232mi[48;5;231m[38;5;232ml[48;5;231m[38;5;232ml[48;5;231m[38;5;232m_[48;5;231m[38;5;232ml[48;5;231m[38;5;232me[48;5;231m[38;5;232mn[48;5;231m[38;5;232mg[48;5;231m[38;5;232mt[48;5;231m[38;5;232mh[48;5;231m[38;5;232m_[48;5;231m[38;5;232mm[48;5;231m[38;5;232mm[48;5;231m[38;5;231m [48;5;231m[38;5;231m [48;5;231m[38;5;231m [48;5;231m[38;5;231m [48;5;231m[38;5;231m [48;5;231m[38;5;231m [48;5;231m[38;5;231m [48;5;231m[38;5;231m [48;5;231m[38;5;231m [48;5;231m[38;5;231m [48;5;231m[38;5;231m [48;5;231m[38;5;231m [48;5;231m[38;5;231m [48;5;231m[38;5;231m [48;5;231m[38;5;231m [48;5;231m[38;5;231m [48;5;231m[38;5;231m [48;5;231m[38;5;231m [48;5;231m[38;5;231m [48;5;231m[38;5;231m [48;5;231m[38;5;231m [48;5;231m[38;5;231m [48;5;231m[38;5;231m [48;5;231m[38;5;231m [48;5;231m[38;5;231m [48;5;231m[38;5;231m [39m[49m
#> [48;5;231m[38;5;231m [48;5;231m[38;5;231m [48;5;231m[38;5;231m [48;5;231m[38;5;231m [48;5;231m[38;5;231m [48;5;231m[38;5;231m [48;5;231m[38;5;231m [48;5;231m[38;5;231m [48;5;231m[38;5;231m [48;5;231m[38;5;231m [48;5;231m[38;5;231m [48;5;231m[38;5;231m [48;5;231m[38;5;231m [48;5;231m[38;5;231m [48;5;231m[38;5;231m [48;5;231m[38;5;231m [48;5;231m[38;5;231m [48;5;231m[38;5;231m [48;5;231m[38;5;231m [48;5;231m[38;5;231m [48;5;231m[38;5;231m [48;5;231m[38;5;231m [48;5;231m[38;5;231m [48;5;231m[38;5;231m [48;5;231m[38;5;231m [48;5;231m[38;5;231m [48;5;231m[38;5;231m [48;5;231m[38;5;231m [48;5;231m[38;5;231m [48;5;231m[38;5;231m [48;5;231m[38;5;231m [48;5;231m[38;5;231m [48;5;231m[38;5;231m [48;5;231m[38;5;231m [48;5;231m[38;5;231m [48;5;231m[38;5;231m [48;5;231m[38;5;231m [48;5;231m[38;5;231m [48;5;231m[38;5;231m [48;5;231m[38;5;231m [48;5;231m[38;5;231m [48;5;231m[38;5;231m [48;5;231m[38;5;231m [48;5;231m[38;5;231m [48;5;231m[38;5;231m [48;5;231m[38;5;231m [48;5;231m[38;5;231m [48;5;231m[38;5;231m [48;5;231m[38;5;231m [48;5;231m[38;5;231m [48;5;231m[38;5;231m [48;5;231m[38;5;231m [48;5;231m[38;5;231m [48;5;231m[38;5;231m [48;5;231m[38;5;231m [48;5;231m[38;5;231m [48;5;231m[38;5;231m [48;5;231m[38;5;231m [48;5;231m[38;5;231m [48;5;231m[38;5;231m [48;5;231m[38;5;231m [48;5;231m[38;5;231m [48;5;231m[38;5;231m [48;5;231m[38;5;231m [48;5;231m[38;5;231m [48;5;231m[38;5;231m [48;5;231m[38;5;231m [48;5;231m[38;5;231m [48;5;231m[38;5;231m [48;5;231m[38;5;231m [39m[49m--width
Control how many characters wide the terminal art is (defaults to your terminal width):
rush plot -x bill_length_mm -y body_mass_g -O ascii --width 40 penguins.csv
#> [48;5;231m[38;5;232mb[48;5;231m[38;5;231m [48;5;231m[38;5;239m6[48;5;231m[38;5;239m0[48;5;231m[38;5;239m0[48;5;231m[38;5;239m0[48;5;231m[38;5;231m [48;5;231m[38;5;231m [48;5;231m[38;5;231m [48;5;231m[38;5;231m [48;5;231m[38;5;231m [48;5;231m[38;5;231m [48;5;231m[38;5;231m [48;5;231m[38;5;231m [48;5;231m[38;5;231m [48;5;231m[38;5;231m [48;5;231m[38;5;231m [48;5;231m[38;5;231m [48;5;231m[38;5;231m [48;5;231m[38;5;231m [48;5;231m[38;5;231m [48;5;232m[38;5;232m@[48;5;231m[38;5;231m [48;5;231m[38;5;231m [48;5;232m[38;5;232m@[48;5;232m[38;5;232m@[48;5;232m[38;5;232m@[48;5;232m[38;5;232m@[48;5;232m[38;5;232m@[48;5;231m[38;5;231m [48;5;231m[38;5;231m [48;5;231m[38;5;231m [48;5;232m[38;5;232m@[48;5;232m[38;5;232m@[48;5;231m[38;5;231m [48;5;231m[38;5;231m [48;5;231m[38;5;231m [48;5;232m[38;5;232m@[48;5;231m[38;5;231m [48;5;231m[38;5;231m [39m[49m
#> [48;5;231m[38;5;232mo[48;5;231m[38;5;231m [48;5;231m[38;5;231m [48;5;231m[38;5;231m [48;5;231m[38;5;231m [48;5;231m[38;5;231m [48;5;231m[38;5;231m [48;5;231m[38;5;231m [48;5;231m[38;5;231m [48;5;231m[38;5;231m [48;5;231m[38;5;231m [48;5;231m[38;5;231m [48;5;231m[38;5;231m [48;5;231m[38;5;231m [48;5;231m[38;5;231m [48;5;231m[38;5;231m [48;5;231m[38;5;231m [48;5;231m[38;5;231m [48;5;231m[38;5;231m [48;5;232m[38;5;232m@[48;5;231m[38;5;231m [48;5;232m[38;5;232m@[48;5;232m[38;5;232m@[48;5;232m[38;5;232m@[48;5;232m[38;5;232m@[48;5;232m[38;5;232m@[48;5;232m[38;5;232m@[48;5;232m[38;5;232m@[48;5;232m[38;5;232m@[48;5;232m[38;5;232m@[48;5;232m[38;5;232m@[48;5;232m[38;5;232m@[48;5;231m[38;5;231m [48;5;231m[38;5;231m [48;5;231m[38;5;231m [48;5;231m[38;5;231m [48;5;231m[38;5;231m [48;5;231m[38;5;231m [48;5;231m[38;5;231m [48;5;231m[38;5;231m [39m[49m
#> [48;5;231m[38;5;232md[48;5;231m[38;5;231m [48;5;231m[38;5;239m5[48;5;231m[38;5;239m0[48;5;231m[38;5;239m0[48;5;231m[38;5;239m0[48;5;231m[38;5;231m [48;5;231m[38;5;231m [48;5;231m[38;5;231m [48;5;231m[38;5;231m [48;5;232m[38;5;232m@[48;5;231m[38;5;231m [48;5;231m[38;5;231m [48;5;232m[38;5;232m@[48;5;231m[38;5;231m [48;5;232m[38;5;232m@[48;5;231m[38;5;231m [48;5;232m[38;5;232m@[48;5;232m[38;5;232m@[48;5;232m[38;5;232m@[48;5;232m[38;5;232m@[48;5;232m[38;5;232m@[48;5;232m[38;5;232m@[48;5;232m[38;5;232m@[48;5;232m[38;5;232m@[48;5;232m[38;5;232m@[48;5;232m[38;5;232m@[48;5;231m[38;5;231m [48;5;232m[38;5;232m@[48;5;232m[38;5;232m@[48;5;232m[38;5;232m@[48;5;232m[38;5;232m@[48;5;231m[38;5;231m [48;5;231m[38;5;231m [48;5;231m[38;5;231m [48;5;231m[38;5;231m [48;5;231m[38;5;231m [48;5;231m[38;5;231m [48;5;231m[38;5;231m [48;5;231m[38;5;231m [39m[49m
#> [48;5;231m[38;5;232my[48;5;231m[38;5;231m [48;5;231m[38;5;239m4[48;5;231m[38;5;239m0[48;5;231m[38;5;239m0[48;5;231m[38;5;239m0[48;5;231m[38;5;231m [48;5;231m[38;5;231m [48;5;231m[38;5;231m [48;5;231m[38;5;231m [48;5;232m[38;5;232m@[48;5;232m[38;5;232m@[48;5;232m[38;5;232m@[48;5;232m[38;5;232m@[48;5;232m[38;5;232m@[48;5;232m[38;5;232m@[48;5;232m[38;5;232m@[48;5;232m[38;5;232m@[48;5;232m[38;5;232m@[48;5;232m[38;5;232m@[48;5;232m[38;5;232m@[48;5;232m[38;5;232m@[48;5;232m[38;5;232m@[48;5;232m[38;5;232m@[48;5;232m[38;5;232m@[48;5;231m[38;5;231m [48;5;232m[38;5;232m@[48;5;232m[38;5;232m@[48;5;232m[38;5;232m@[48;5;232m[38;5;232m@[48;5;231m[38;5;231m [48;5;232m[38;5;232m@[48;5;231m[38;5;231m [48;5;232m[38;5;232m@[48;5;231m[38;5;231m [48;5;231m[38;5;231m [48;5;231m[38;5;231m [48;5;231m[38;5;231m [48;5;231m[38;5;231m [48;5;231m[38;5;231m [39m[49m
#> [48;5;231m[38;5;232m_[48;5;231m[38;5;231m [48;5;231m[38;5;231m [48;5;231m[38;5;231m [48;5;231m[38;5;231m [48;5;231m[38;5;231m [48;5;231m[38;5;231m [48;5;231m[38;5;231m [48;5;232m[38;5;232m@[48;5;232m[38;5;232m@[48;5;232m[38;5;232m@[48;5;232m[38;5;232m@[48;5;232m[38;5;232m@[48;5;232m[38;5;232m@[48;5;232m[38;5;232m@[48;5;232m[38;5;232m@[48;5;232m[38;5;232m@[48;5;232m[38;5;232m@[48;5;232m[38;5;232m@[48;5;232m[38;5;232m@[48;5;232m[38;5;232m@[48;5;232m[38;5;232m@[48;5;232m[38;5;232m@[48;5;232m[38;5;232m@[48;5;231m[38;5;231m [48;5;232m[38;5;232m@[48;5;232m[38;5;232m@[48;5;232m[38;5;232m@[48;5;232m[38;5;232m@[48;5;232m[38;5;232m@[48;5;232m[38;5;232m@[48;5;231m[38;5;231m [48;5;231m[38;5;231m [48;5;231m[38;5;231m [48;5;231m[38;5;231m [48;5;231m[38;5;231m [48;5;232m[38;5;232m@[48;5;231m[38;5;231m [48;5;231m[38;5;231m [48;5;231m[38;5;231m [39m[49m
#> [48;5;231m[38;5;232mm[48;5;231m[38;5;231m [48;5;231m[38;5;239m3[48;5;231m[38;5;239m0[48;5;231m[38;5;239m0[48;5;231m[38;5;239m0[48;5;231m[38;5;231m [48;5;232m[38;5;232m@[48;5;232m[38;5;232m@[48;5;231m[38;5;231m [48;5;232m[38;5;232m@[48;5;232m[38;5;232m@[48;5;232m[38;5;232m@[48;5;232m[38;5;232m@[48;5;232m[38;5;232m@[48;5;232m[38;5;232m@[48;5;231m[38;5;231m [48;5;231m[38;5;231m [48;5;231m[38;5;231m [48;5;232m[38;5;232m@[48;5;231m[38;5;231m [48;5;231m[38;5;231m [48;5;231m[38;5;231m [48;5;232m[38;5;232m@[48;5;231m[38;5;231m [48;5;231m[38;5;231m [48;5;231m[38;5;231m [48;5;231m[38;5;231m [48;5;231m[38;5;231m [48;5;231m[38;5;231m [48;5;231m[38;5;231m [48;5;231m[38;5;231m [48;5;231m[38;5;231m [48;5;231m[38;5;231m [48;5;231m[38;5;231m [48;5;231m[38;5;231m [48;5;231m[38;5;231m [48;5;231m[38;5;231m [48;5;231m[38;5;231m [48;5;231m[38;5;231m [39m[49m
#> [48;5;231m[38;5;232ma[48;5;231m[38;5;231m [48;5;231m[38;5;231m [48;5;231m[38;5;231m [48;5;231m[38;5;231m [48;5;231m[38;5;231m [48;5;231m[38;5;231m [48;5;231m[38;5;231m [48;5;231m[38;5;231m [48;5;231m[38;5;231m [48;5;231m[38;5;231m [48;5;231m[38;5;231m [48;5;231m[38;5;231m [48;5;231m[38;5;231m [48;5;231m[38;5;231m [48;5;231m[38;5;239m4[48;5;231m[38;5;239m0[48;5;231m[38;5;231m [48;5;231m[38;5;231m [48;5;231m[38;5;231m [48;5;231m[38;5;231m [48;5;231m[38;5;231m [48;5;231m[38;5;231m [48;5;231m[38;5;231m [48;5;231m[38;5;231m [48;5;231m[38;5;231m [48;5;231m[38;5;239m5[48;5;231m[38;5;239m0[48;5;231m[38;5;231m [48;5;231m[38;5;231m [48;5;231m[38;5;231m [48;5;231m[38;5;231m [48;5;231m[38;5;231m [48;5;231m[38;5;231m [48;5;231m[38;5;231m [48;5;231m[38;5;231m [48;5;231m[38;5;231m [48;5;231m[38;5;239m6[48;5;231m[38;5;239m0[48;5;231m[38;5;231m [39m[49m
#> [48;5;231m[38;5;232ms[48;5;231m[38;5;231m [48;5;231m[38;5;231m [48;5;231m[38;5;231m [48;5;231m[38;5;231m [48;5;231m[38;5;231m [48;5;231m[38;5;231m [48;5;231m[38;5;231m [48;5;231m[38;5;231m [48;5;231m[38;5;231m [48;5;231m[38;5;231m [48;5;231m[38;5;231m [48;5;231m[38;5;231m [48;5;231m[38;5;231m [48;5;231m[38;5;231m [48;5;231m[38;5;232mb[48;5;231m[38;5;232mi[48;5;231m[38;5;232ml[48;5;231m[38;5;232ml[48;5;231m[38;5;232m_[48;5;231m[38;5;232ml[48;5;231m[38;5;232me[48;5;231m[38;5;232mn[48;5;231m[38;5;232mg[48;5;231m[38;5;232mt[48;5;231m[38;5;232mh[48;5;231m[38;5;232m_[48;5;231m[38;5;232mm[48;5;231m[38;5;232mm[48;5;231m[38;5;231m [48;5;231m[38;5;231m [48;5;231m[38;5;231m [48;5;231m[38;5;231m [48;5;231m[38;5;231m [48;5;231m[38;5;231m [48;5;231m[38;5;231m [48;5;231m[38;5;231m [48;5;231m[38;5;231m [48;5;231m[38;5;231m [48;5;231m[38;5;231m [39m[49m
#> [48;5;231m[38;5;232ms[48;5;231m[38;5;231m [48;5;231m[38;5;231m [48;5;231m[38;5;231m [48;5;231m[38;5;231m [48;5;231m[38;5;231m [48;5;231m[38;5;231m [48;5;231m[38;5;231m [48;5;231m[38;5;231m [48;5;231m[38;5;231m [48;5;231m[38;5;231m [48;5;231m[38;5;231m [48;5;231m[38;5;231m [48;5;231m[38;5;231m [48;5;231m[38;5;231m [48;5;231m[38;5;231m [48;5;231m[38;5;231m [48;5;231m[38;5;231m [48;5;231m[38;5;231m [48;5;231m[38;5;231m [48;5;231m[38;5;231m [48;5;231m[38;5;231m [48;5;231m[38;5;231m [48;5;231m[38;5;231m [48;5;231m[38;5;231m [48;5;231m[38;5;231m [48;5;231m[38;5;231m [48;5;231m[38;5;231m [48;5;231m[38;5;231m [48;5;231m[38;5;231m [48;5;231m[38;5;231m [48;5;231m[38;5;231m [48;5;231m[38;5;231m [48;5;231m[38;5;231m [48;5;231m[38;5;231m [48;5;231m[38;5;231m [48;5;231m[38;5;231m [48;5;231m[38;5;231m [48;5;231m[38;5;231m [48;5;231m[38;5;231m [39m[49m--output-format ansi / ascii (-O)
Without -O, the behaviour depends on whether stdout is a terminal. When it is, rush renders ANSI art automatically. When it is not (piped or redirected), it outputs raw PNG bytes by default. Use -O ansi to force terminal art regardless:
rush plot -x bill_length_mm -y body_mass_g -O ansi penguins.csv | less -RThe ascii variant uses plain ASCII characters without ANSI color codes, which is useful for environments that do not support colors:
Without a terminal
When stdout is not a terminal (for example, piped into another command), rush outputs raw PNG bytes by default. You can redirect this to a file:
rush plot -x bill_length_mm -y body_mass_g penguins.csv > scatter.pngSaving plots
--output (-o)
When --output points to a file, the plot is saved (device inferred from extension):
rush plot -x bill_length_mm -y body_mass_g -c species -o scatter.png penguins.csv
ls -la scatter.png
#> -rw-r--r-- 1 runner runner 149622 Jul 30 13:04 scatter.png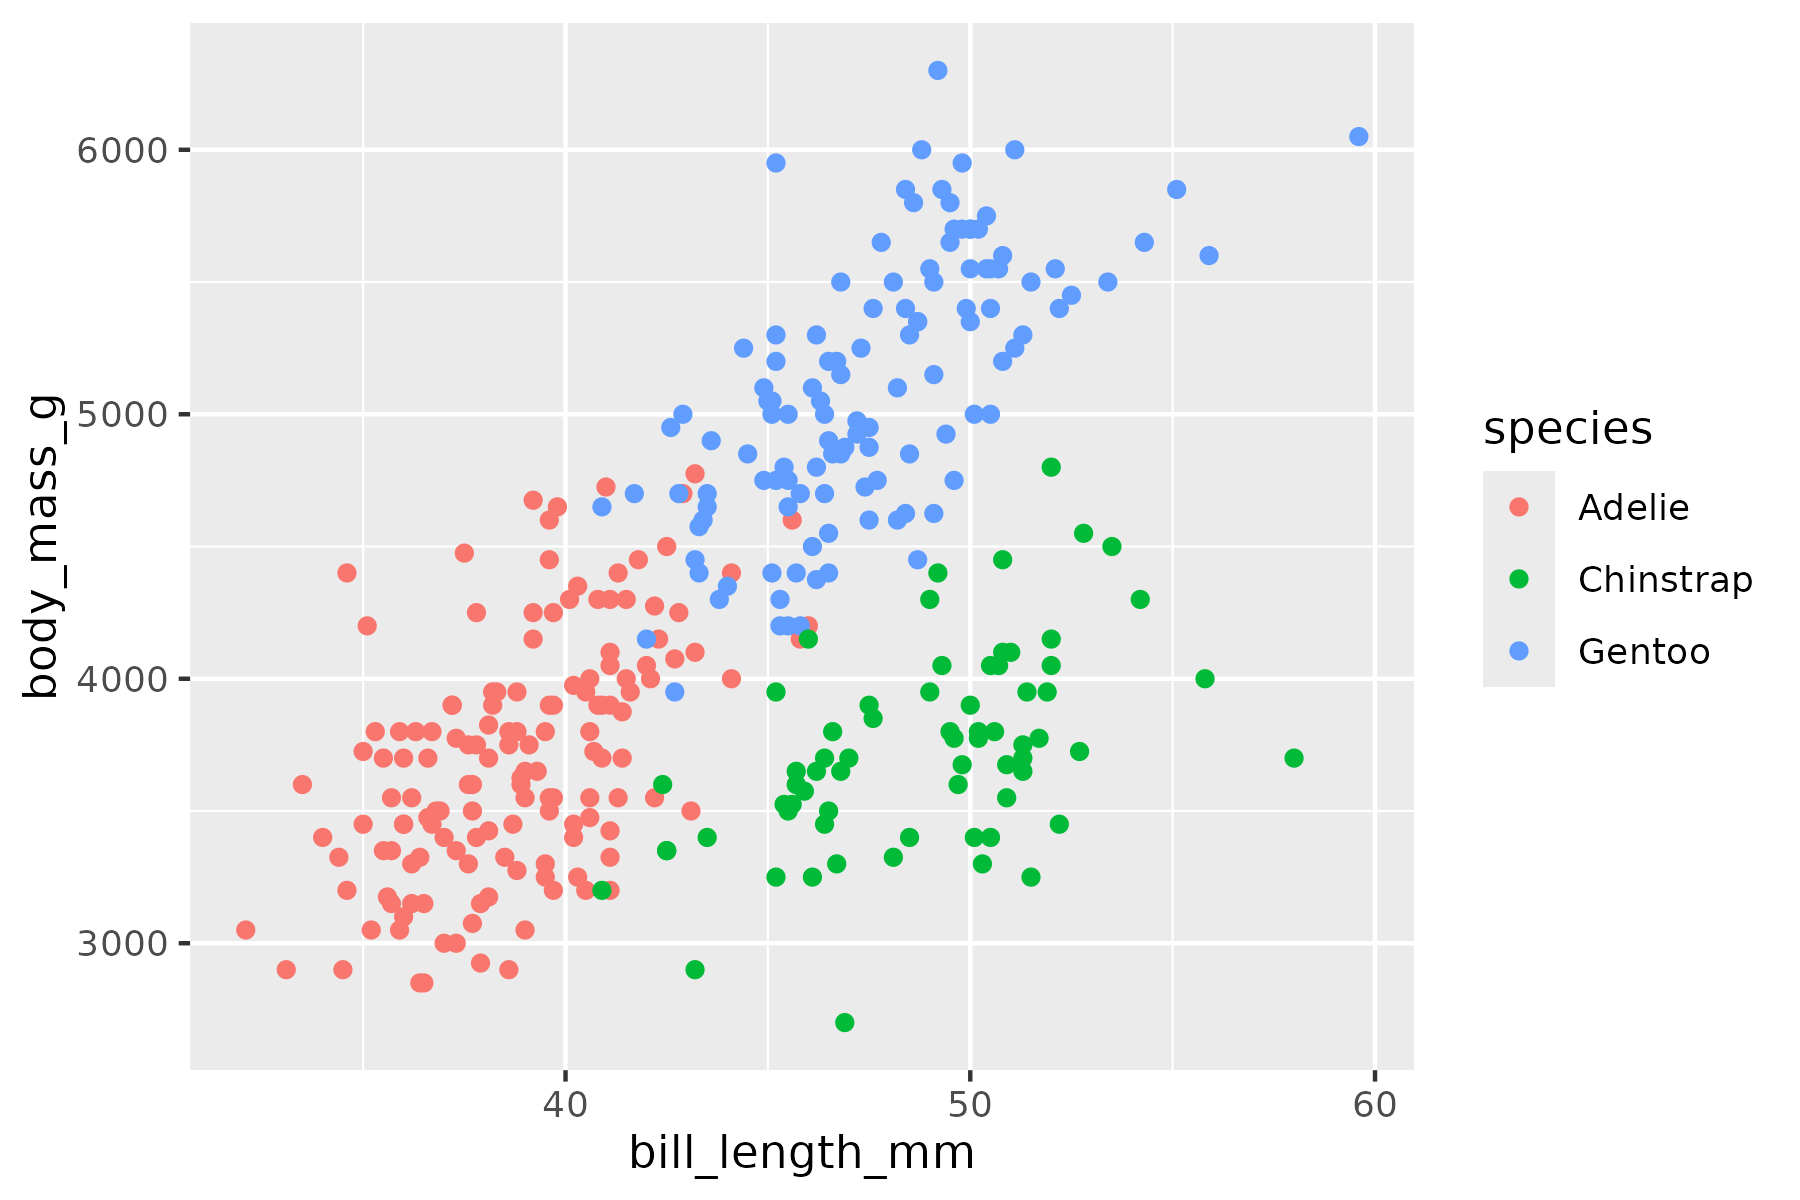
--width, --height, --units, --dpi
Control the saved image dimensions and resolution:
rush plot -x bill_length_mm -y body_mass_g -o hires.png --width 10 --height 6 --units in --dpi 150 penguins.csv
ls -la hires.png
#> -rw-r--r-- 1 runner runner 93207 Jul 30 13:04 hires.png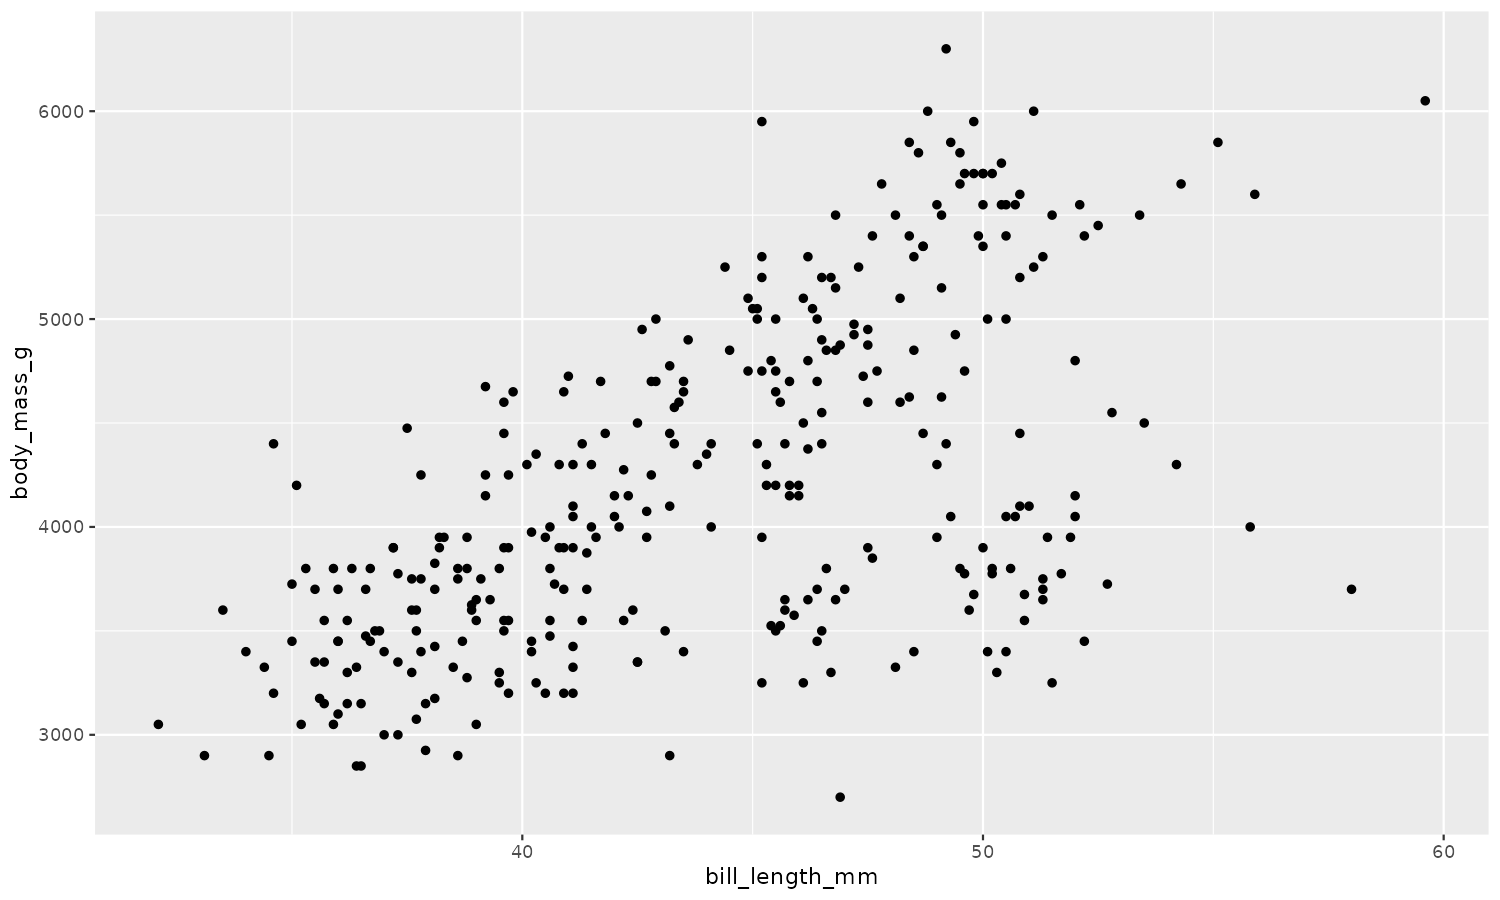
Reading from stdin
Without a file argument, plot reads from standard input:
rush run 'head(df, 50)' penguins.csv | rush plot -x bill_length_mm -y body_mass_g -o plot-stdin.png -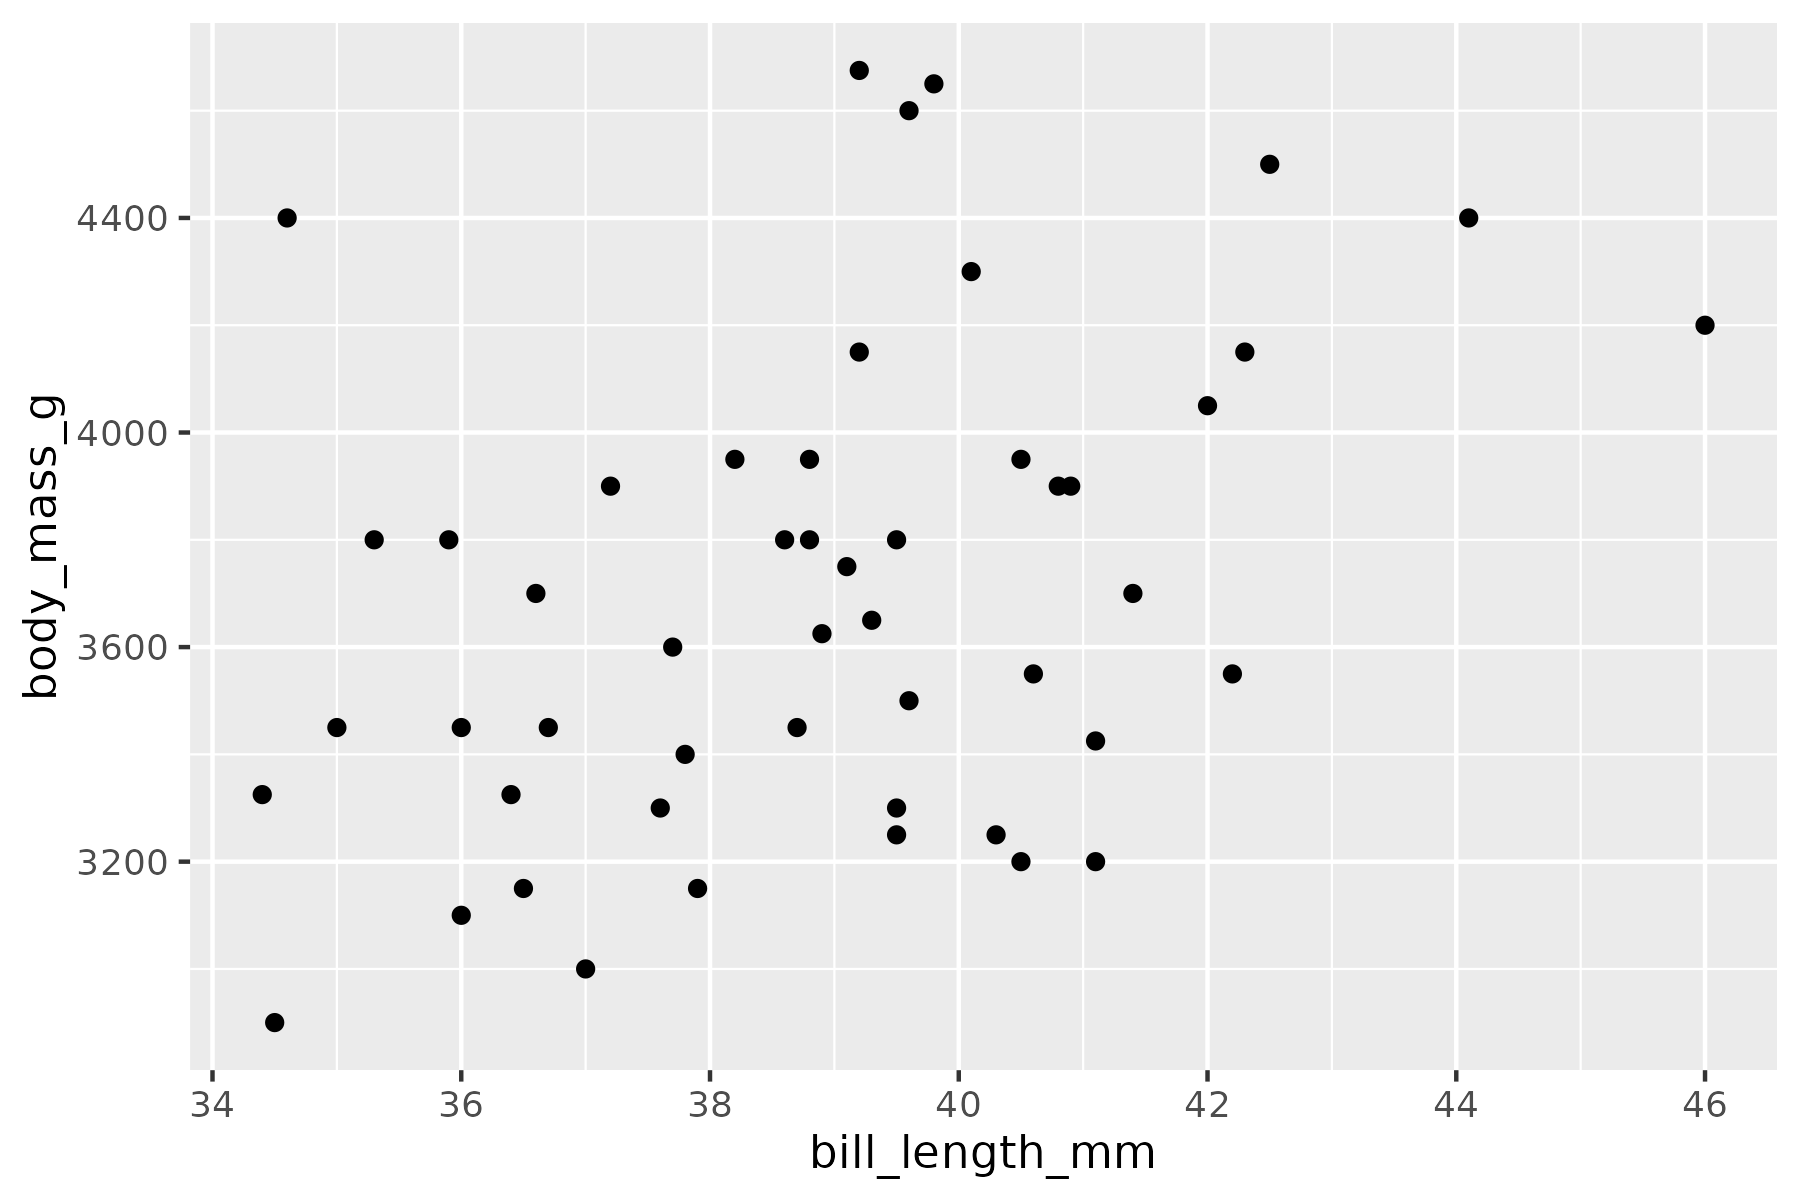
Multiple files
With multiple files, each is read into dfs. Use --pre to combine them into df before plotting:
echo "src,x,y
A,1,2
A,2,4
A,3,5" > a.csv
echo "src,x,y
B,1,3
B,2,2
B,3,6" > b.csv
rush plot -x x -y y -c src --pre 'df <- dplyr::bind_rows(dfs)' -o plot-multi.png a.csv b.csv
rm -f a.csv b.csv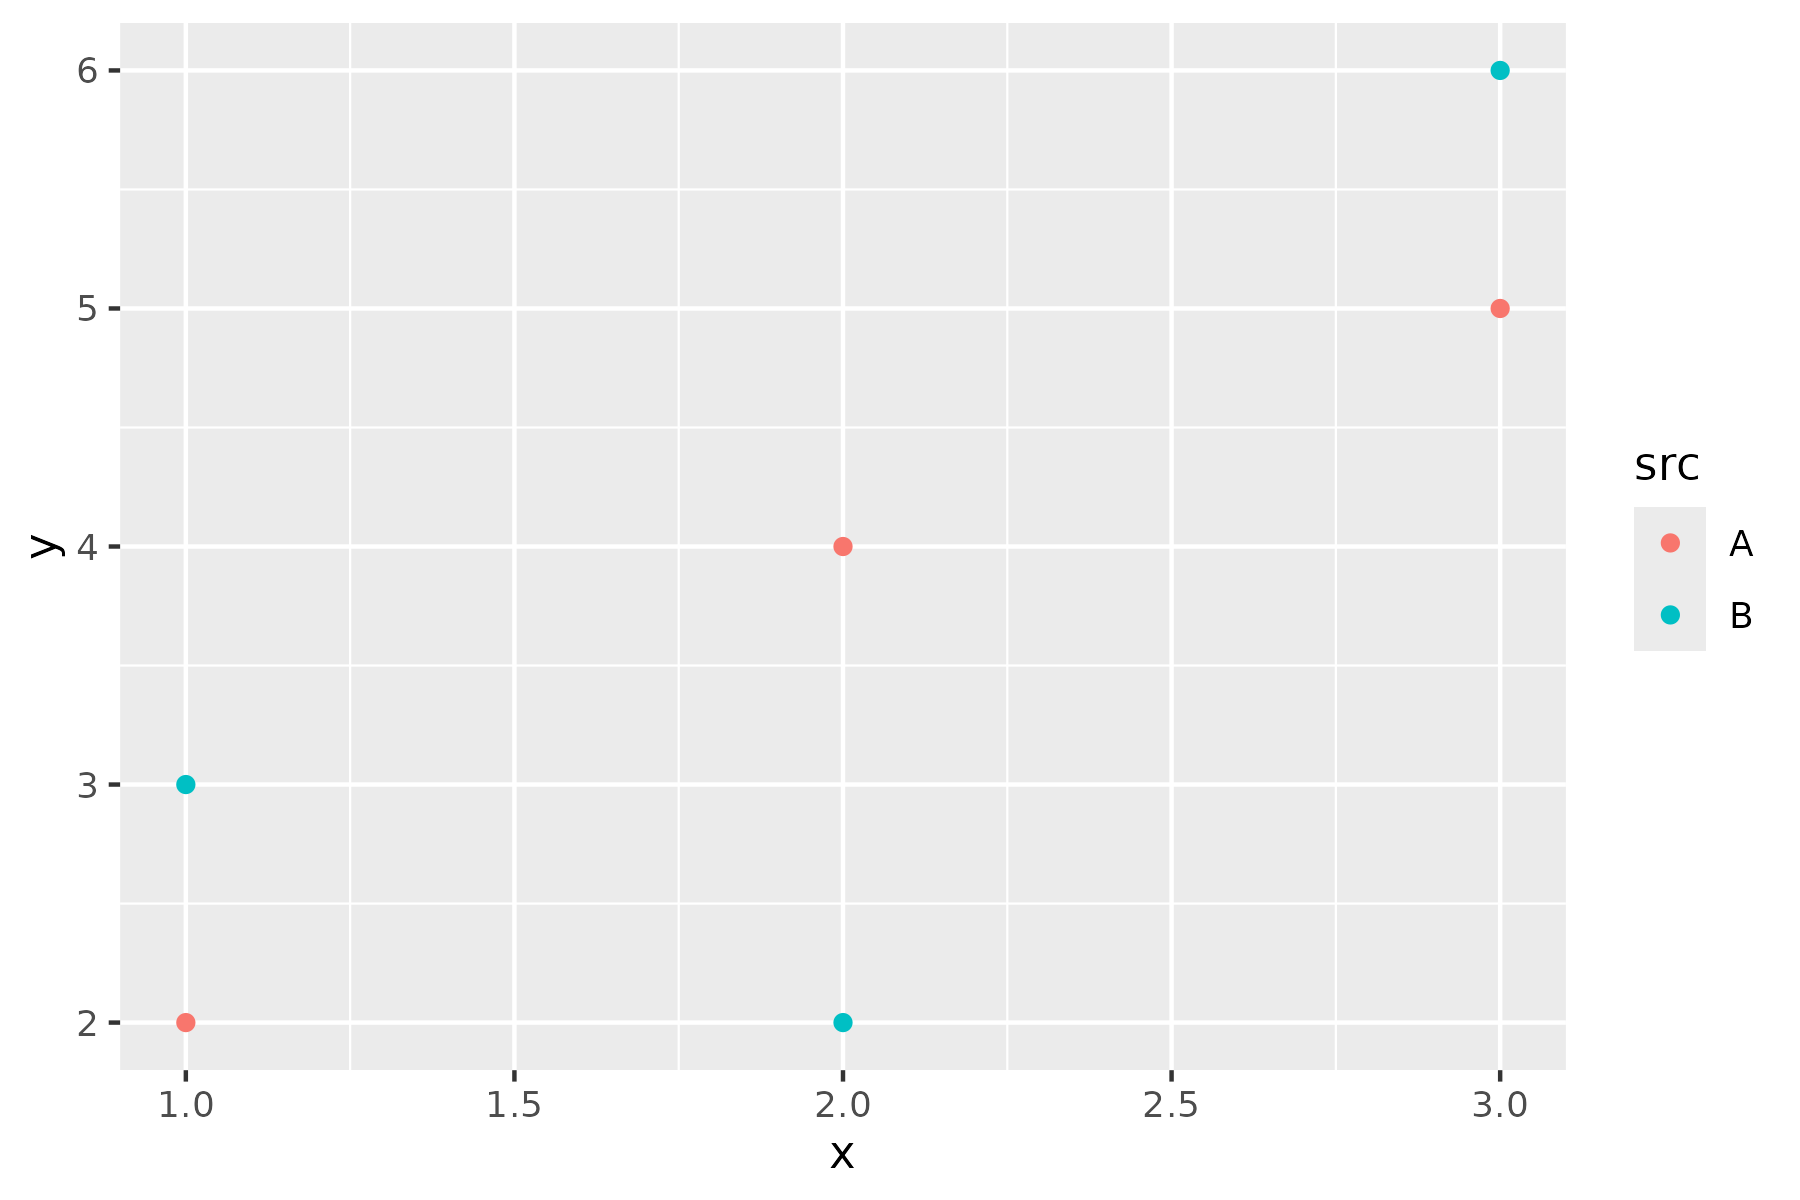
Help
rush plot -h
#> rush: Quick plot
#>
#> Usage:
#>   rush plot [options] [--] [<file>...]
#>
#> Arguments:
#>   <file>                   Data file(s) to read before plotting. The reader is
#>                            chosen by extension: '.parquet'/'.pq' via
#>                            nanoparquet, '.duckdb'/'.ddb' via DuckDB, everything
#>                            else as delimited text. A single file is read into a
#>                            data frame named 'df'; use '-' or omit to read
#>                            delimited text from standard input. Multiple files
#>                            are each read into a named element of a list 'dfs';
#>                            combine them into 'df' yourself with the --pre
#>                            option, e.g. 'df <- dplyr::bind_rows(dfs)'.
#>
#> Reading options:
#>   -d, --delimiter <str>         Delimiter (input and output) [default: ,].
#>       --input-delimiter <str>   Input delimiter (overrides -d).
#>   -F, --input-format <format>   Input format [default: auto].
#>       --input-sheet <name|int>  Excel sheet to read.
#>       --names <a,b,c>           Column names (implies no input header).
#>   -C, --no-clean-names          No clean names.
#>   -H, --no-header               No header (input and output).
#>       --no-input-header         No input header.
#>       --no-output-header        No output header.
#>
#> Setup options:
#>   -l, --library <name>          Libraries to load.
#>   -t, --tidyverse               Enter the Tidyverse.
#>
#> Plotting options:
#>       --aes <key=value>         Additional aesthetics.
#>   -a, --alpha <name>            Alpha column.
#>   -c, --color <name>            Color column.
#>       --facets <formula>        Facet specification.
#>   -f, --fill <name>             Fill column.
#>   -g, --geom <geom>             Geometry [default: auto].
#>       --group <name>            Group column.
#>       --log <x|y|xy>            Variables to log transform.
#>       --margins                 Display marginal facets.
#>       --post <code>             Code to run after plotting.
#>       --pre <code>              Code to run before plotting.
#>       --shape <name>            Shape column.
#>       --size <name>             Size column.
#>       --title <str>             Plot title.
#>   -x, --x <name>                X column.
#>       --xlab <str>              X axis label.
#>   -y, --y <name>                Y column.
#>       --ylab <str>              Y axis label.
#>   -z, --z <name>                Z column.
#>
#> Saving options:
#>       --dpi <int>               Plot resolution [default: 300].
#>       --head <int>              Limit output rows.
#>       --height <num>            Plot height.
#>   -o, --output <str>            Output file.
#>   -D, --output-delimiter <str>  Output delimiter (overrides -d).
#>   -O, --output-format <format>  Output format [default: auto].
#>       --output-indent <int>     Indentation level (JSON, YAML) [default: 2].
#>       --output-record <str>     Record element name (XML, TOML) [default: record].
#>       --output-root <str>       Root element name (XML) [default: root].
#>       --output-sheet <str>      Excel sheet name to write.
#>       --units <str>             Plot size units [default: in].
#>   -w, --width <num>             Plot width.
#>
#> General options:
#>   -n, --dry-run                 Only print generated script.
#>   -h, --help                    Show this help.
#>   -I, --no-ir                   Run with Rscript, not ir.
#>   -R, --no-rush                 Inline all code (no rush dep).
#>       --seed <int>              Seed random number generator.
#>   -v, --verbose                 Be verbose.
#>       --version                 Show version.